


3D Scanning Cars With Photogrammetry
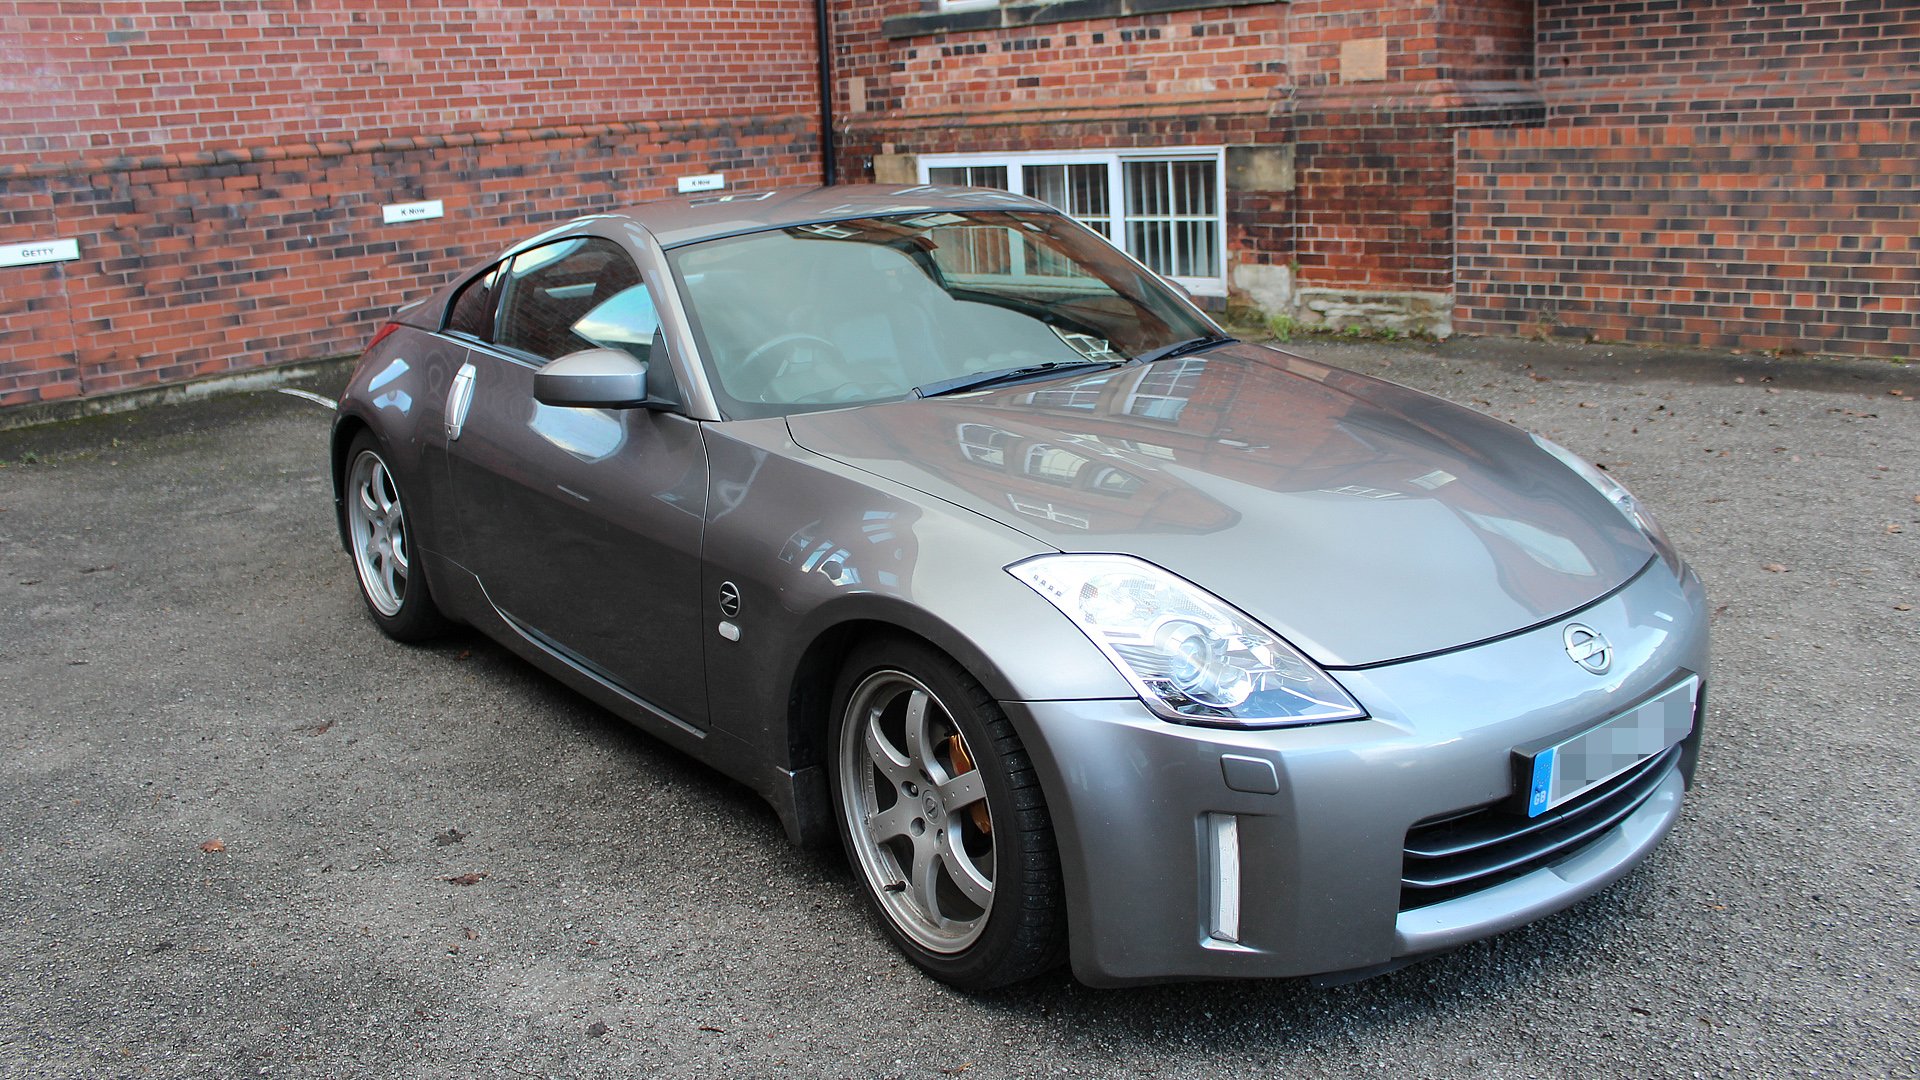
The example we're giving away on this page was actually our very first attempt at scanning a car around 2 years ago. We purposefully chose the hardest one we could i,e pure white with decals and coloured surfaces. The aim was to get close to laser scanner quality without destroying the car or without spraying the entire thing with expensive and hard to remove matting powder as used in our scanning reflective objects tutorial.
Since this test our techniques have improved considerably and the were now able to scan with around 3 times to resolution of the free example. which we would now consider crude compared to what we have in store for the tutorial.
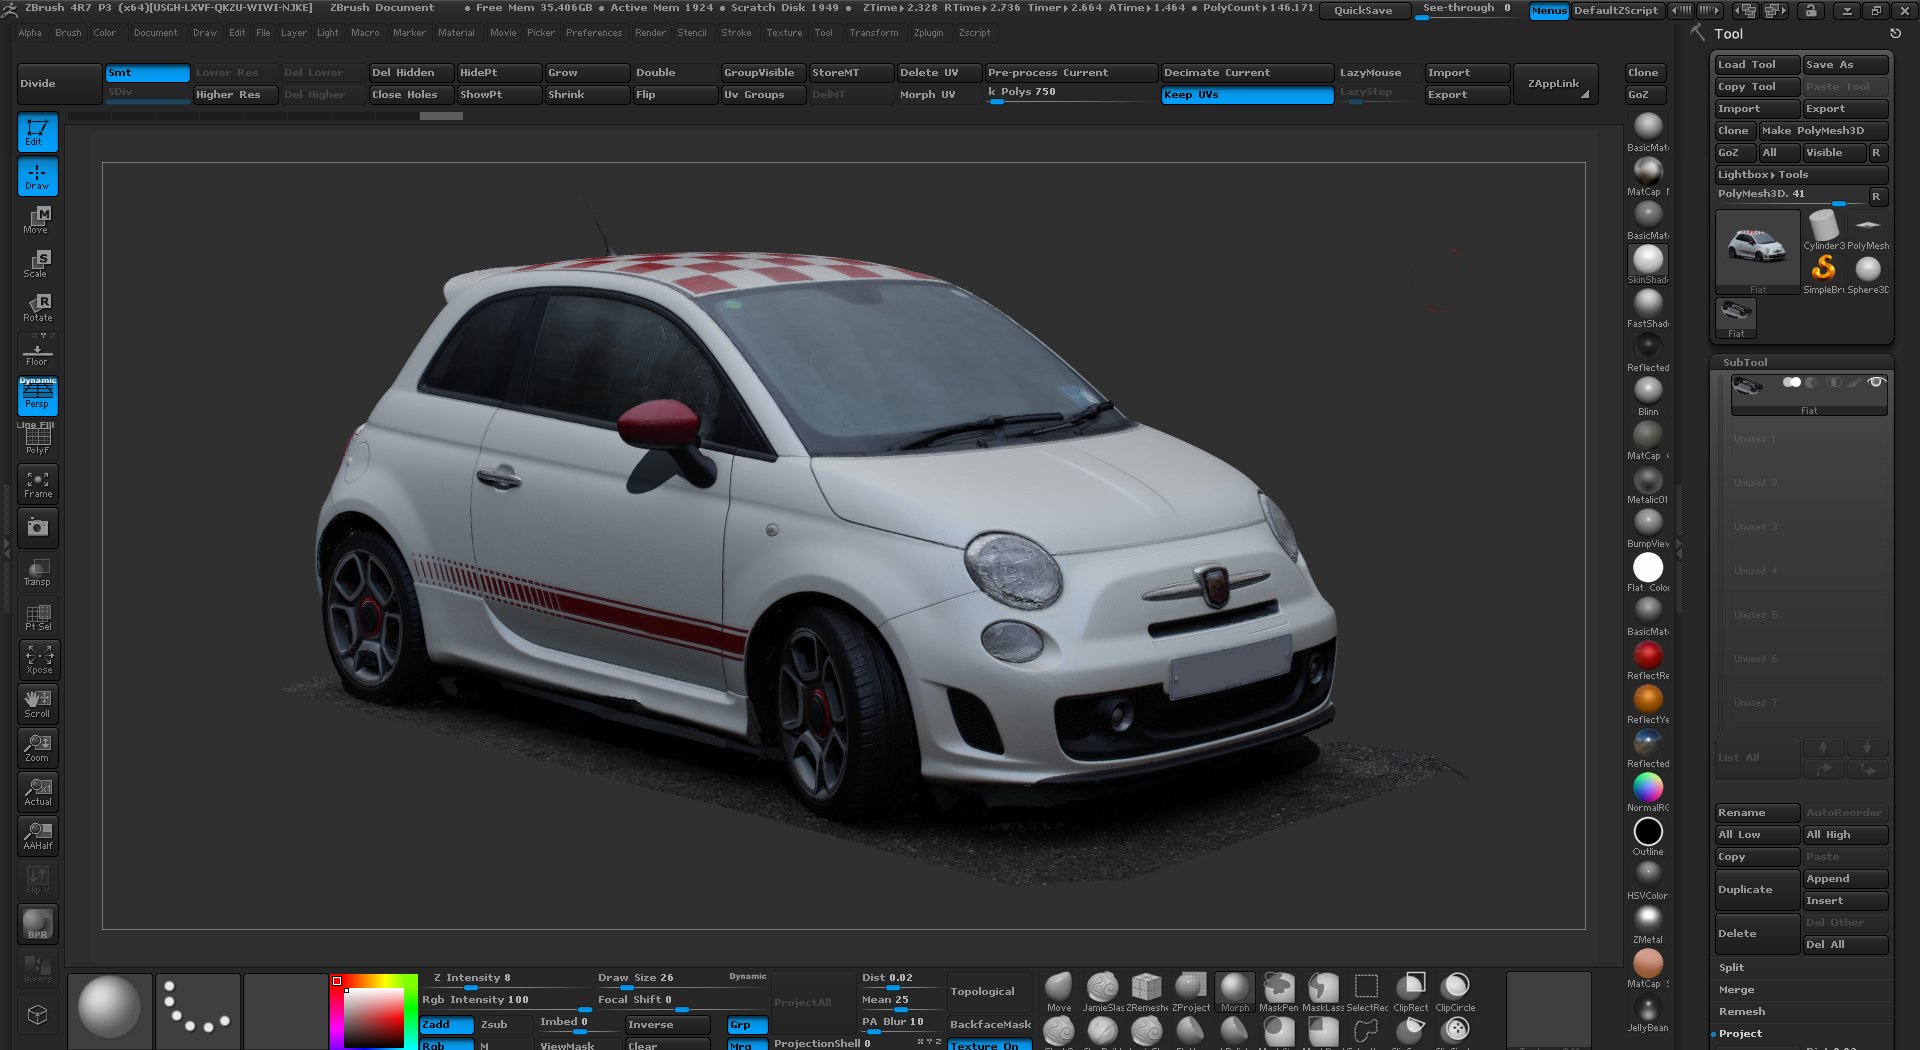
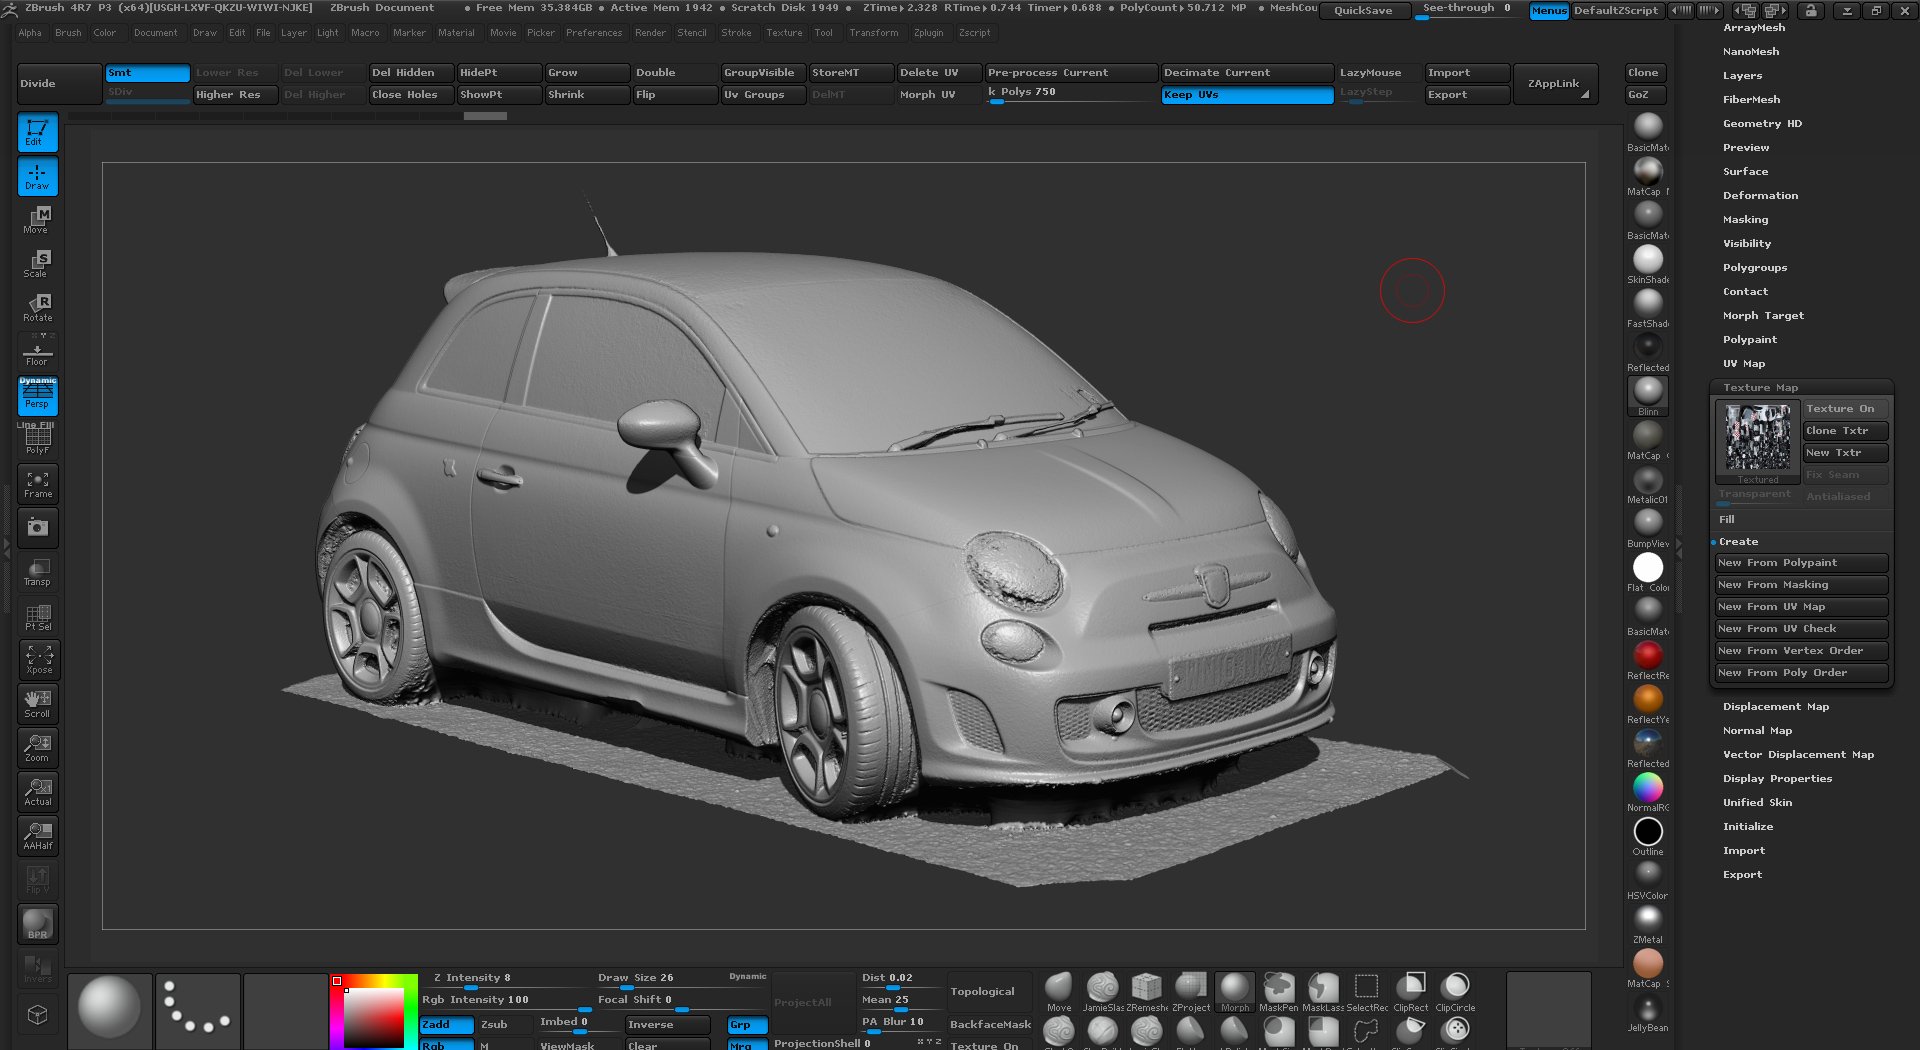
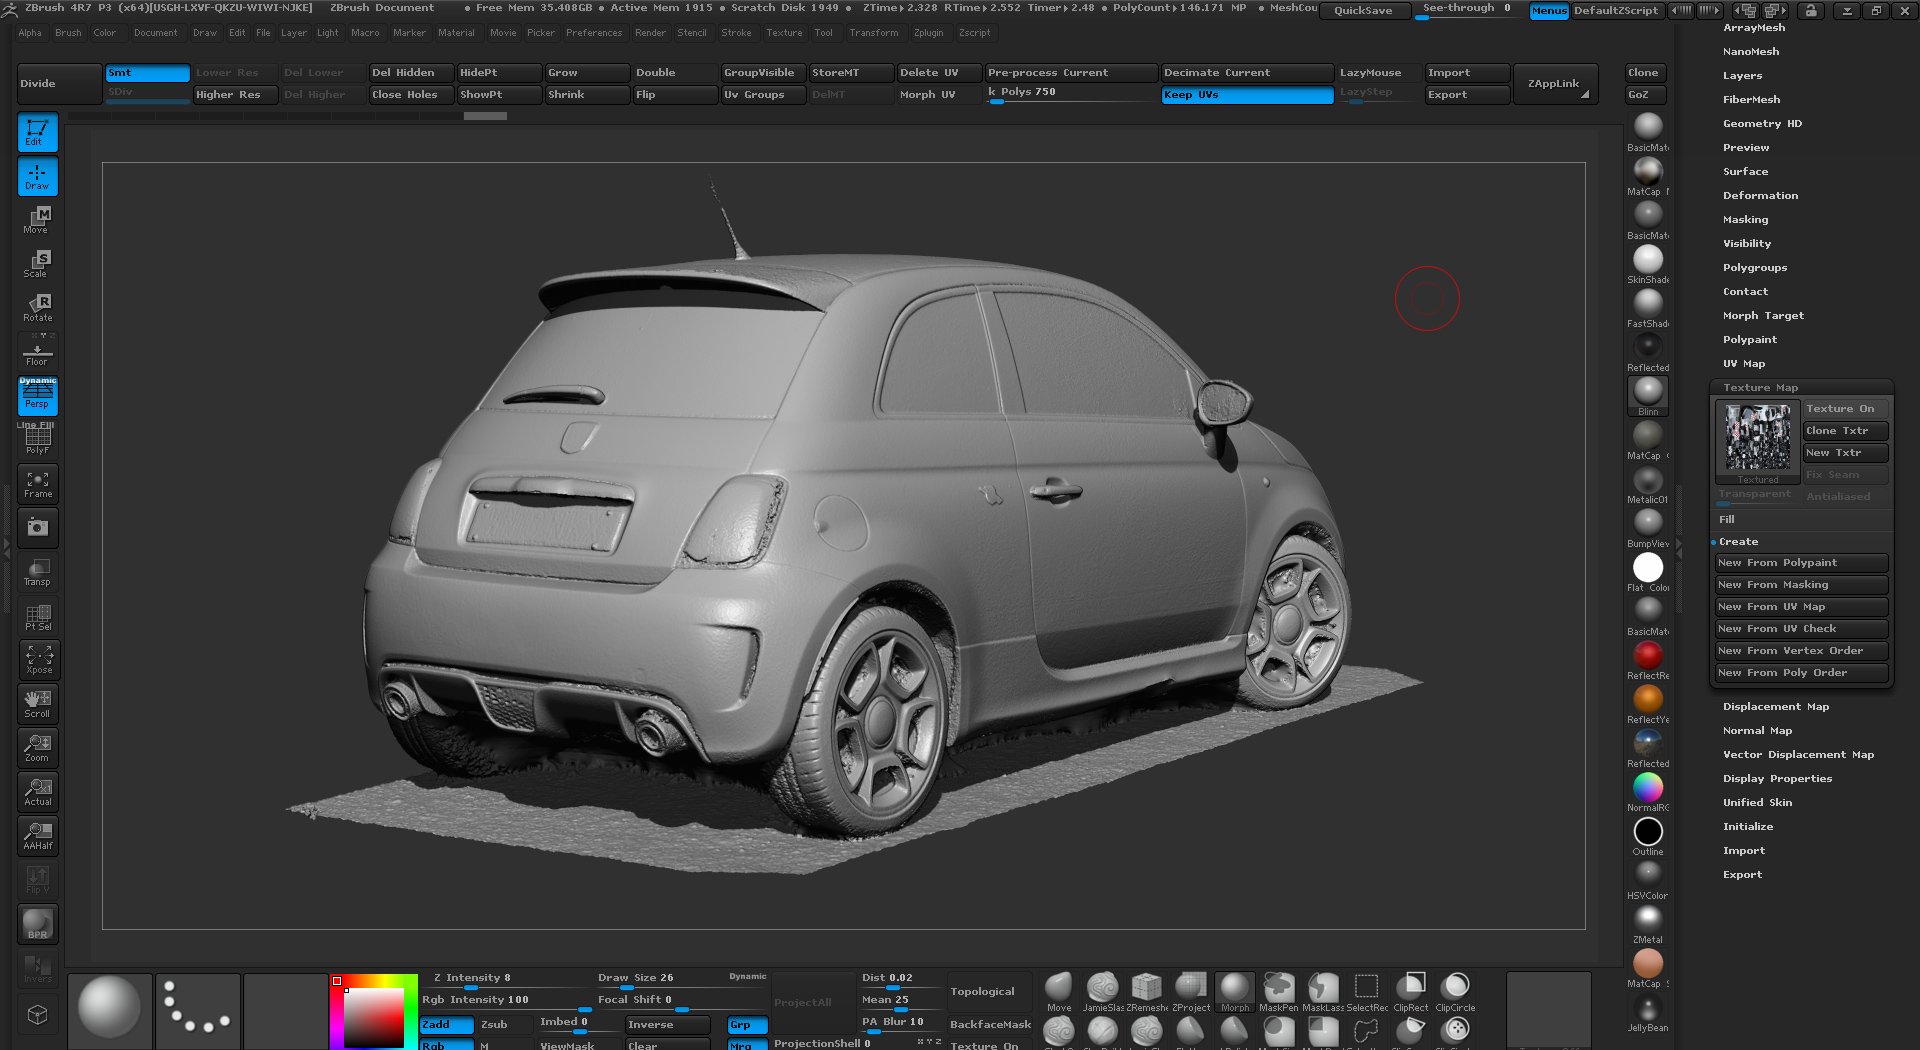
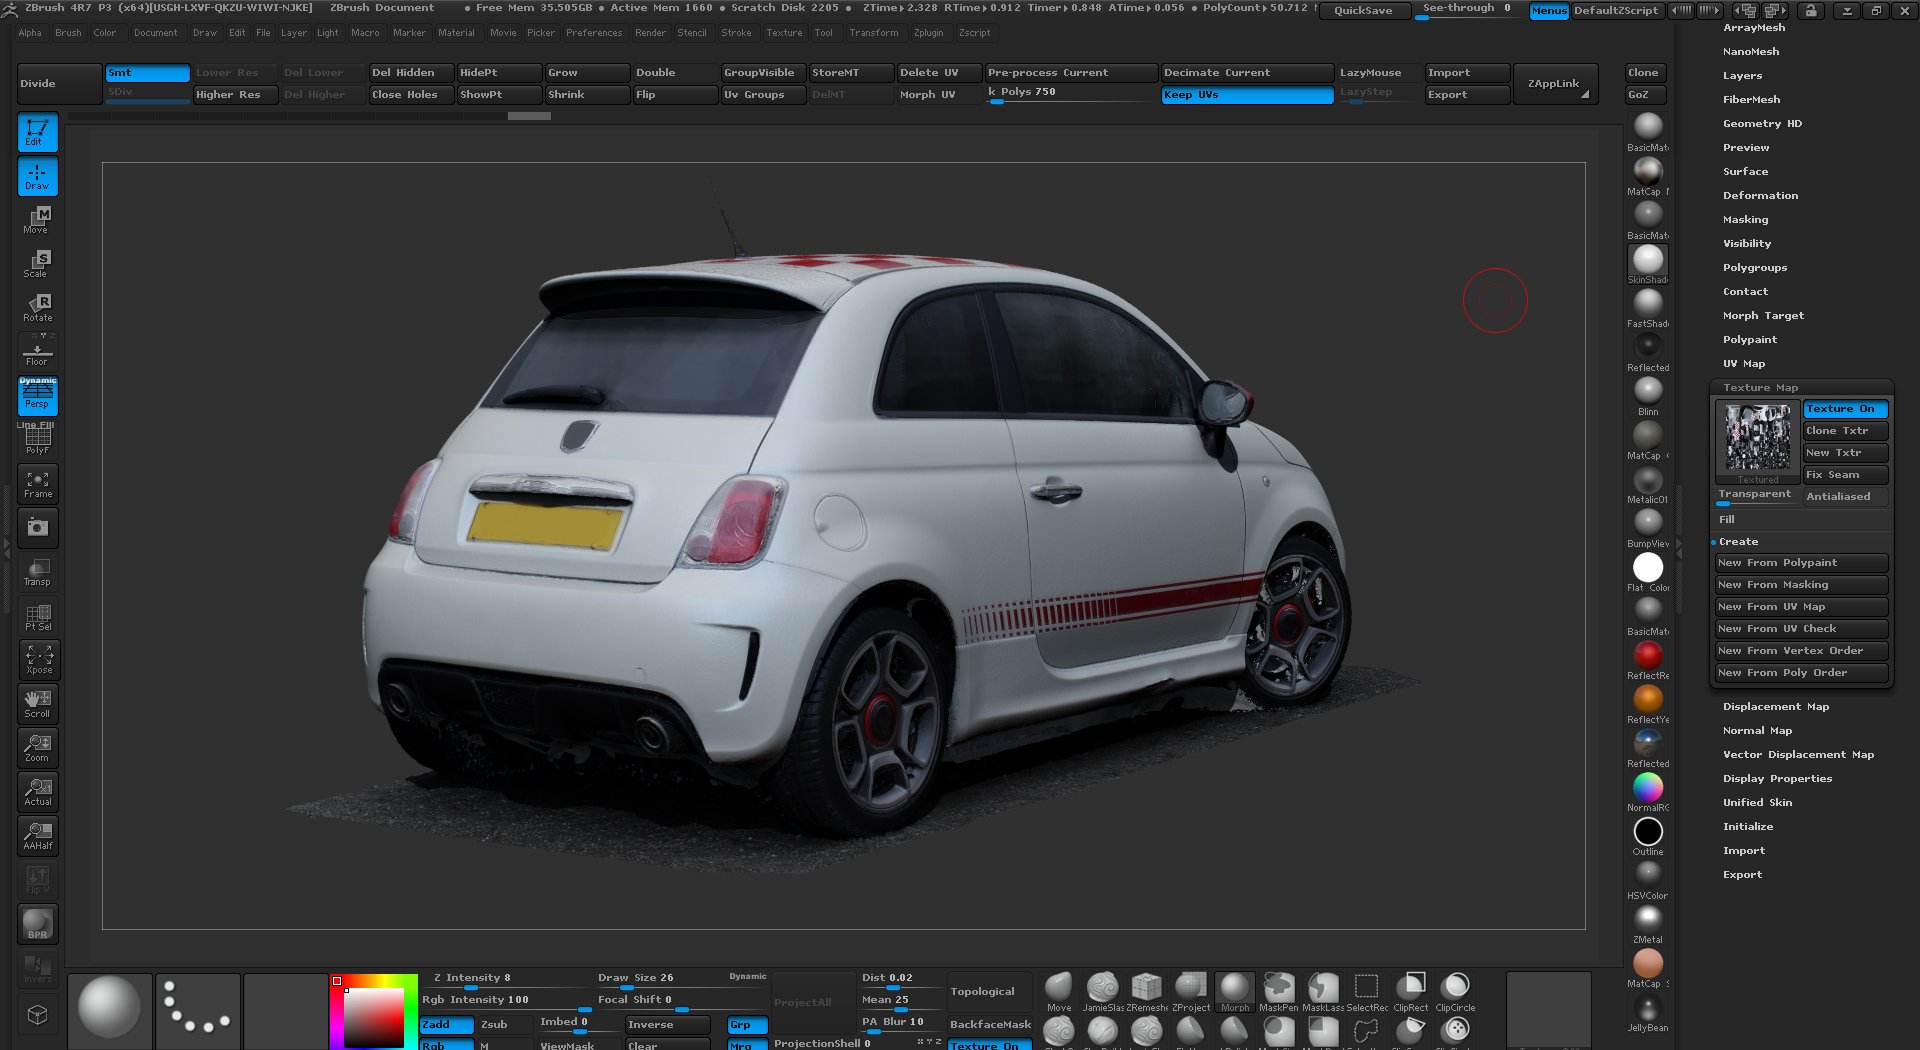
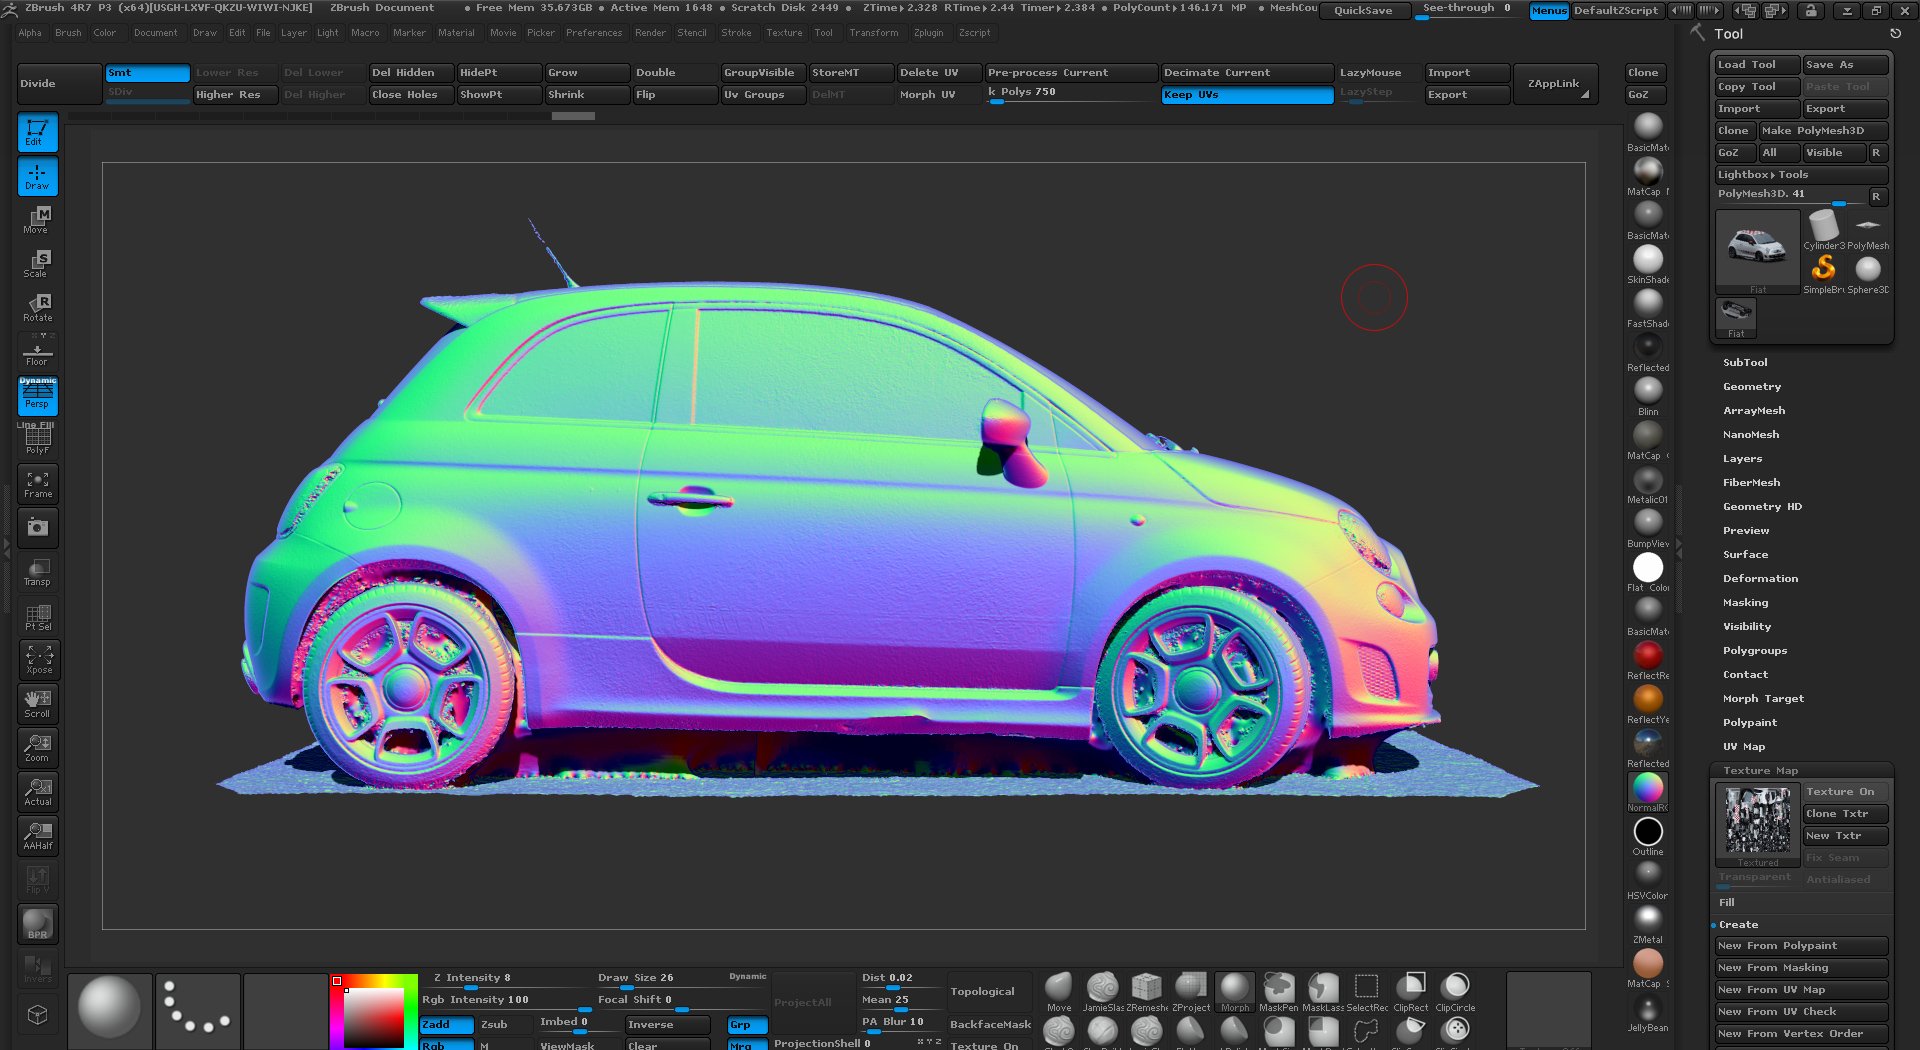
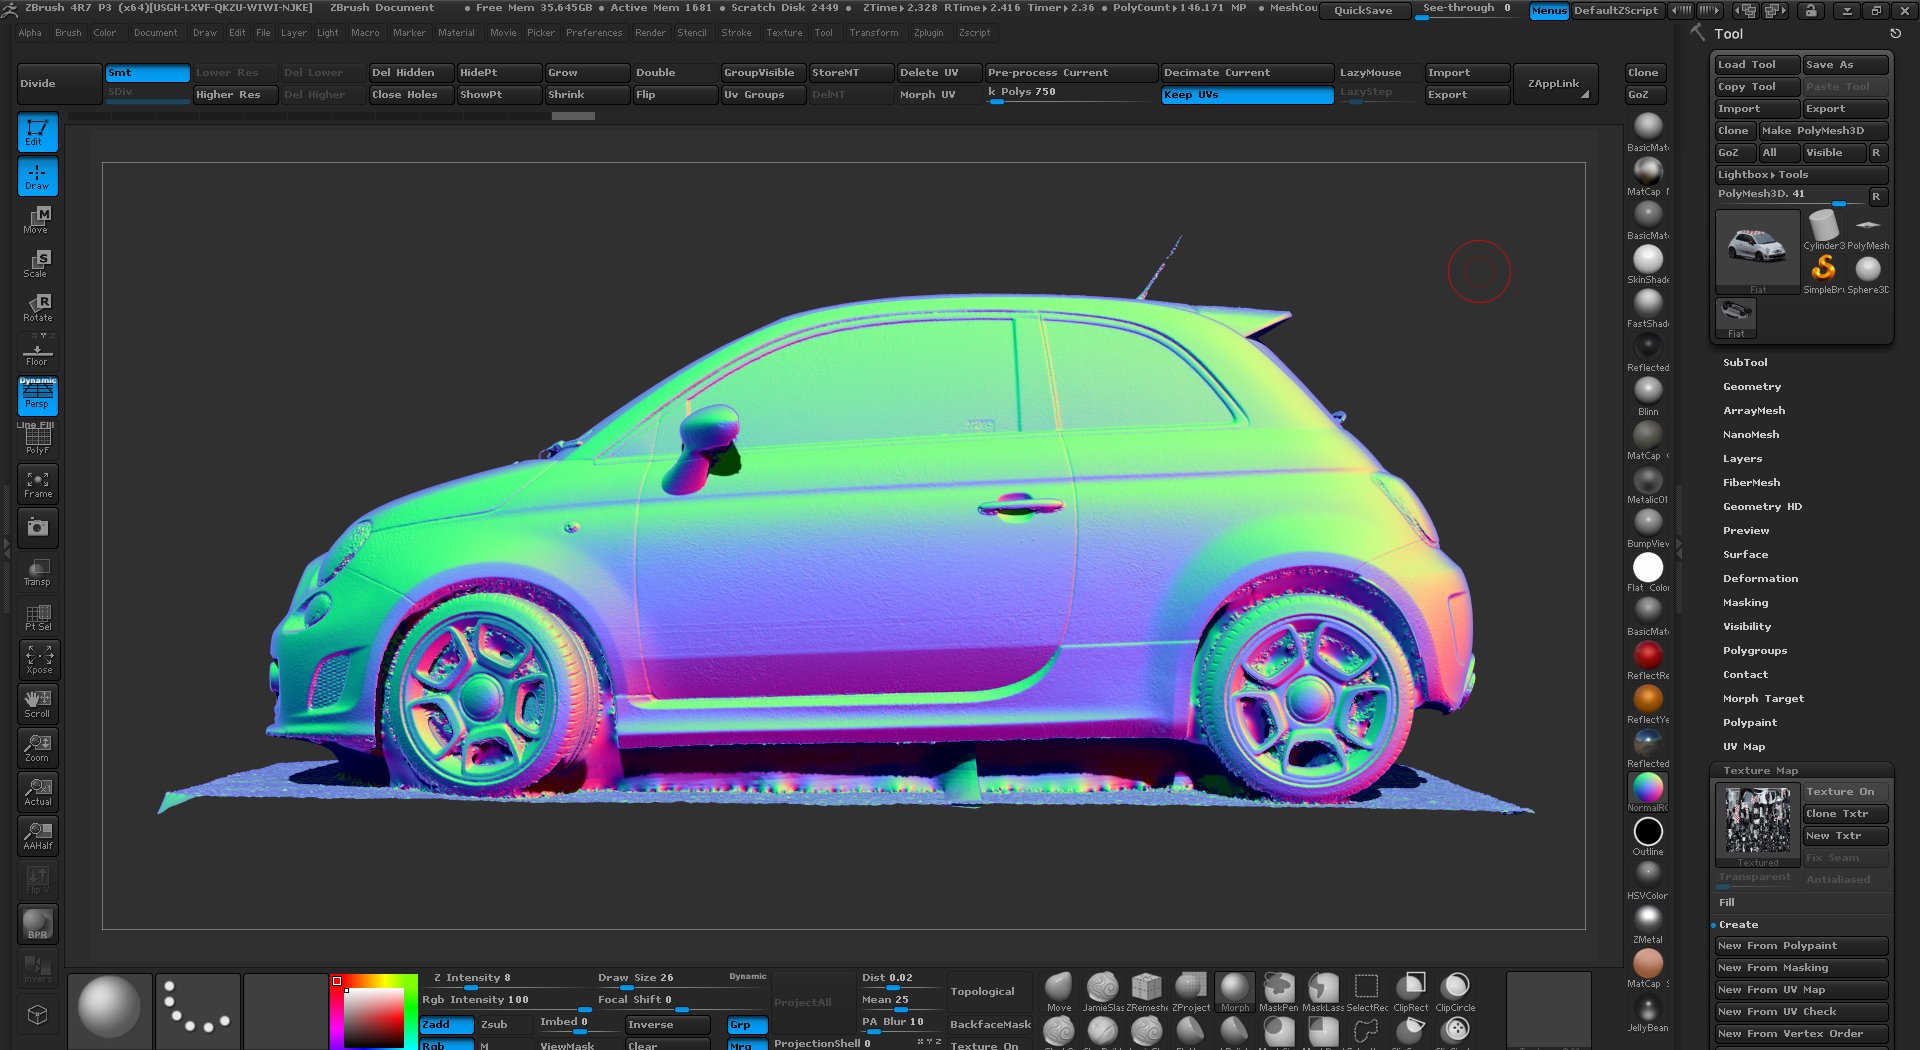
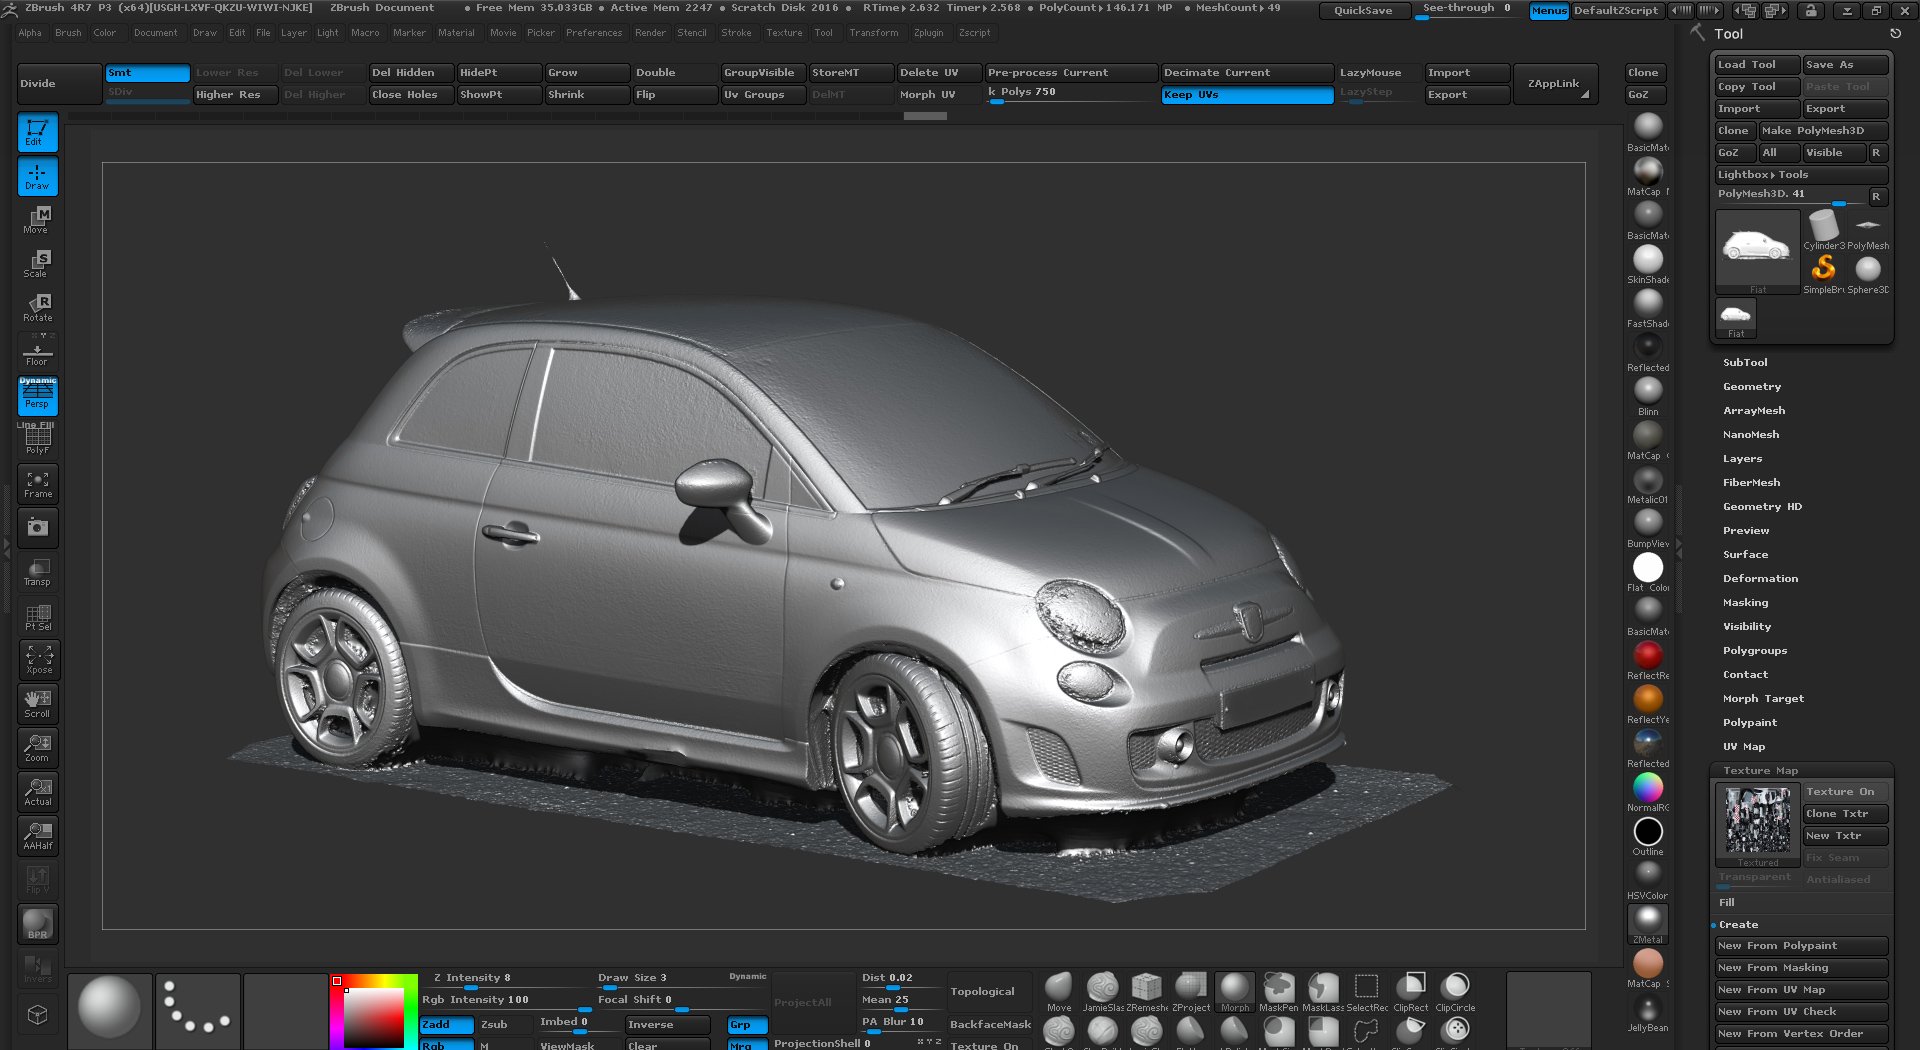
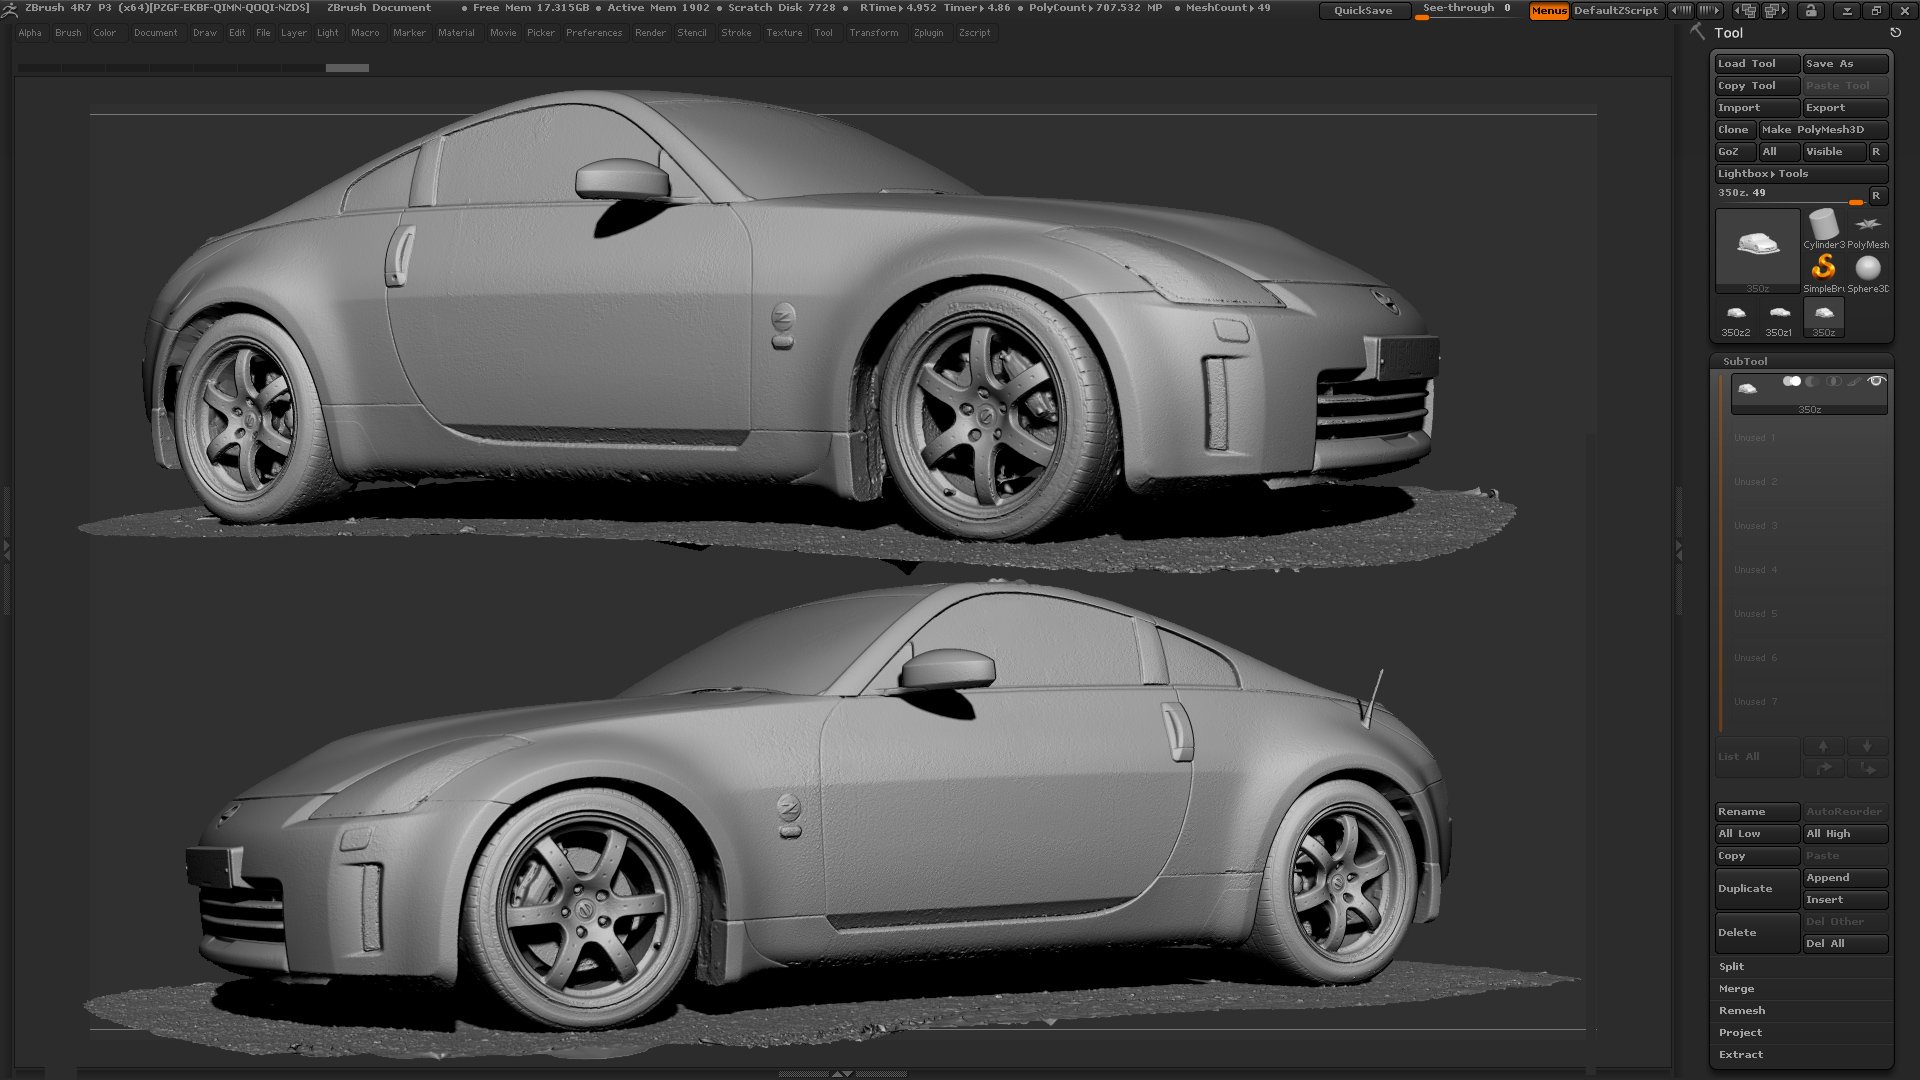
Here are some more images of the scan loaded into Zbrush, As you can see from the renders below at the time there were some issues with scanning the highly reflective / refractive areas such as the headlights. Also, highly occluded areas under the wheels and around the exhaust suffered due to a number of factors including lack of image coverage and poor lighting on the day of the shoot. We now have full proof low-cost techniques to tackle these issues that will be explained in the tutorial. The textures on this model are also fairly low quality due again to the lack of proper coverage and changing lighting conditions. Due to the high reflectivity of the windscreen glass, the resulting glancing angle reflections have combined during processing to make for a pretty nasty white sheen. This effect may, unfortunately, be totally unavoidable however glass is transparent and as such has no colour so we see very little point in actually trying to solve this problem. Typically a model like this would be remodelled from scratch with shaders providing the glass surface rather than a captured texture.
Technical Details
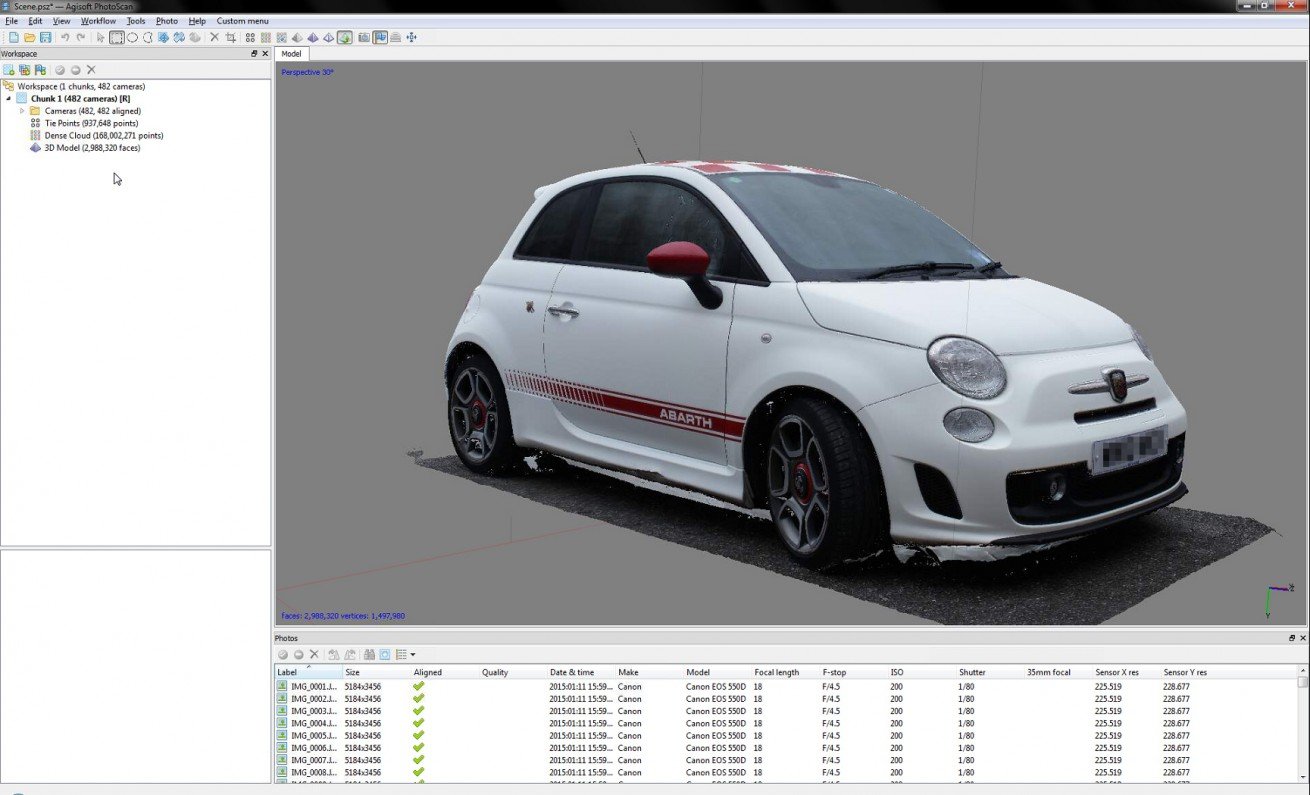
- Photographs used :: 482
- Processing Software :: AGI Photoscan
- Point Cloud :: 168,000,000 points
- Capture Time :: 40 minutes
- Processing time :: 9 hours in AGI
- Camera :: Canon 100D

We hope you can find some use for the scan, it's a perfect starting point for creating a 100% accurate model using just about the best reference you can possibly have. please be sure to read the legal information on the next page before downloading.
More images

AGI Photoscan scene
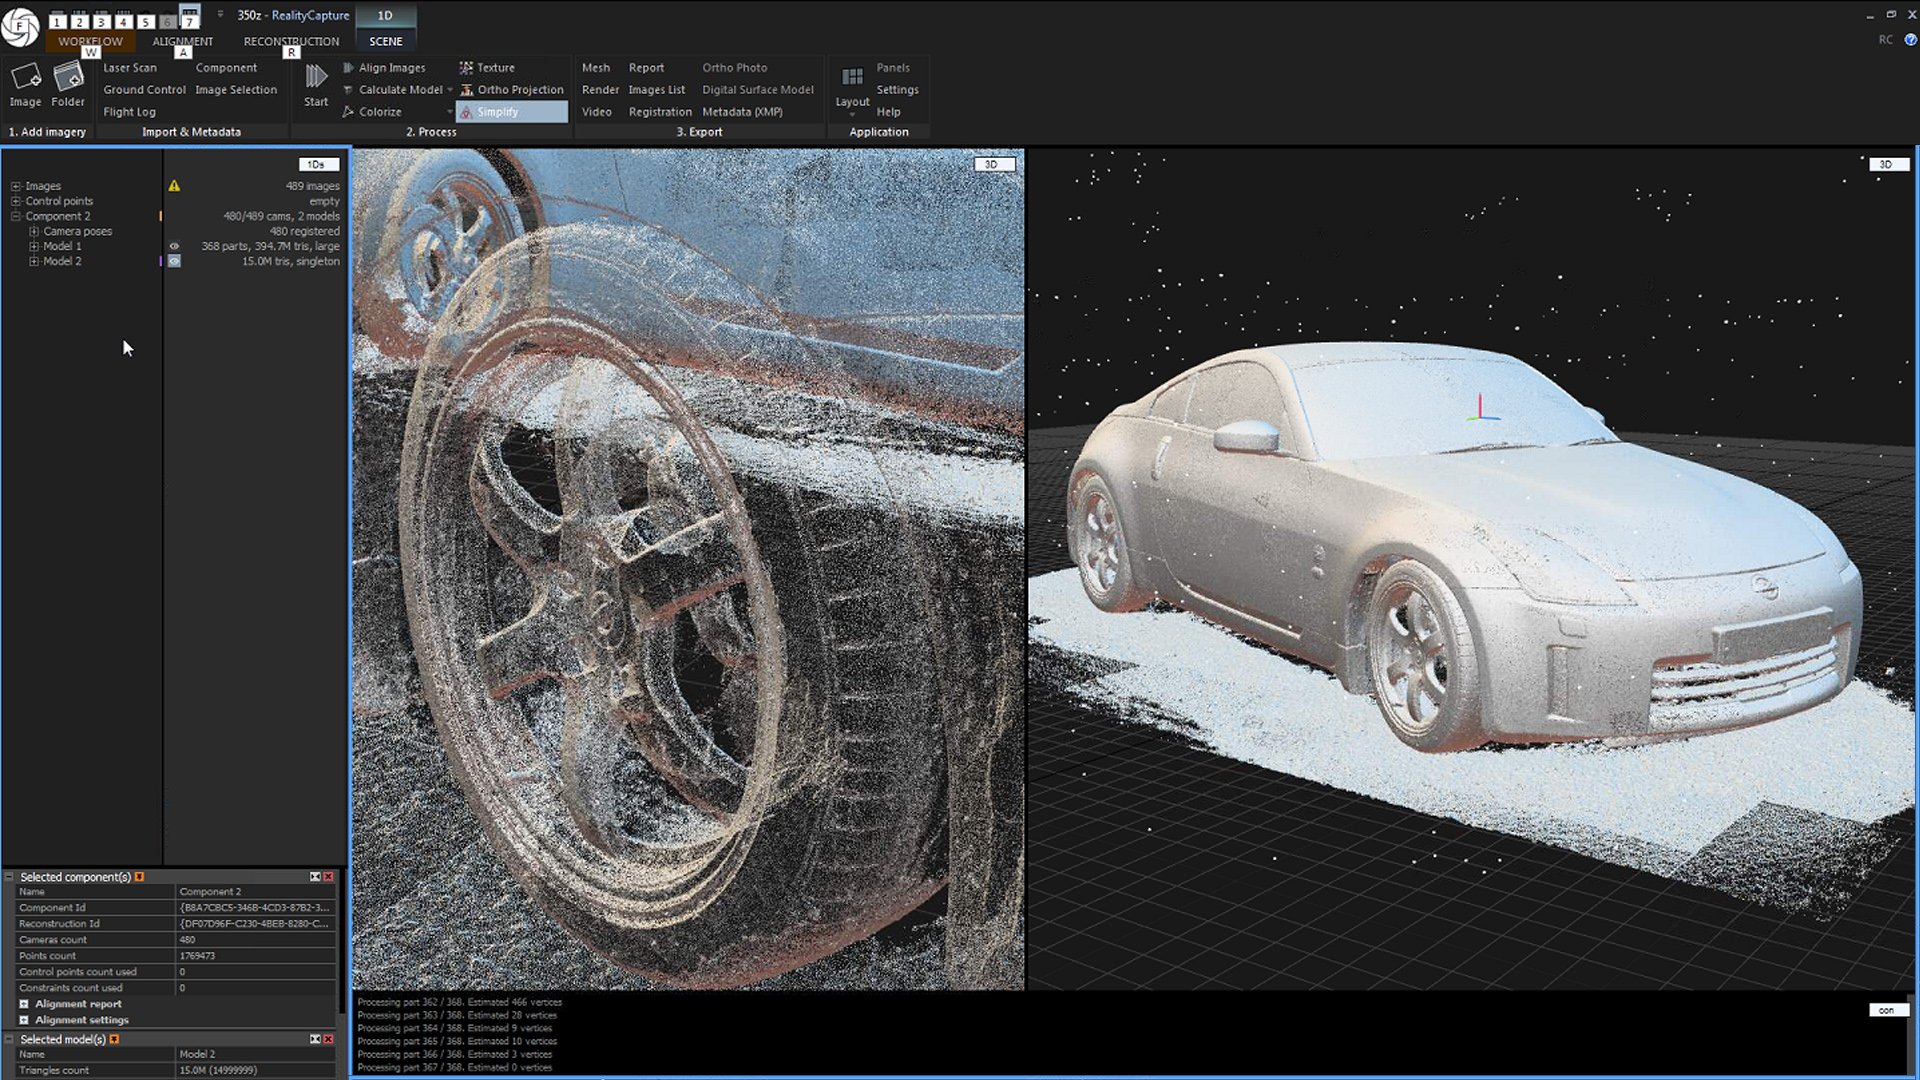
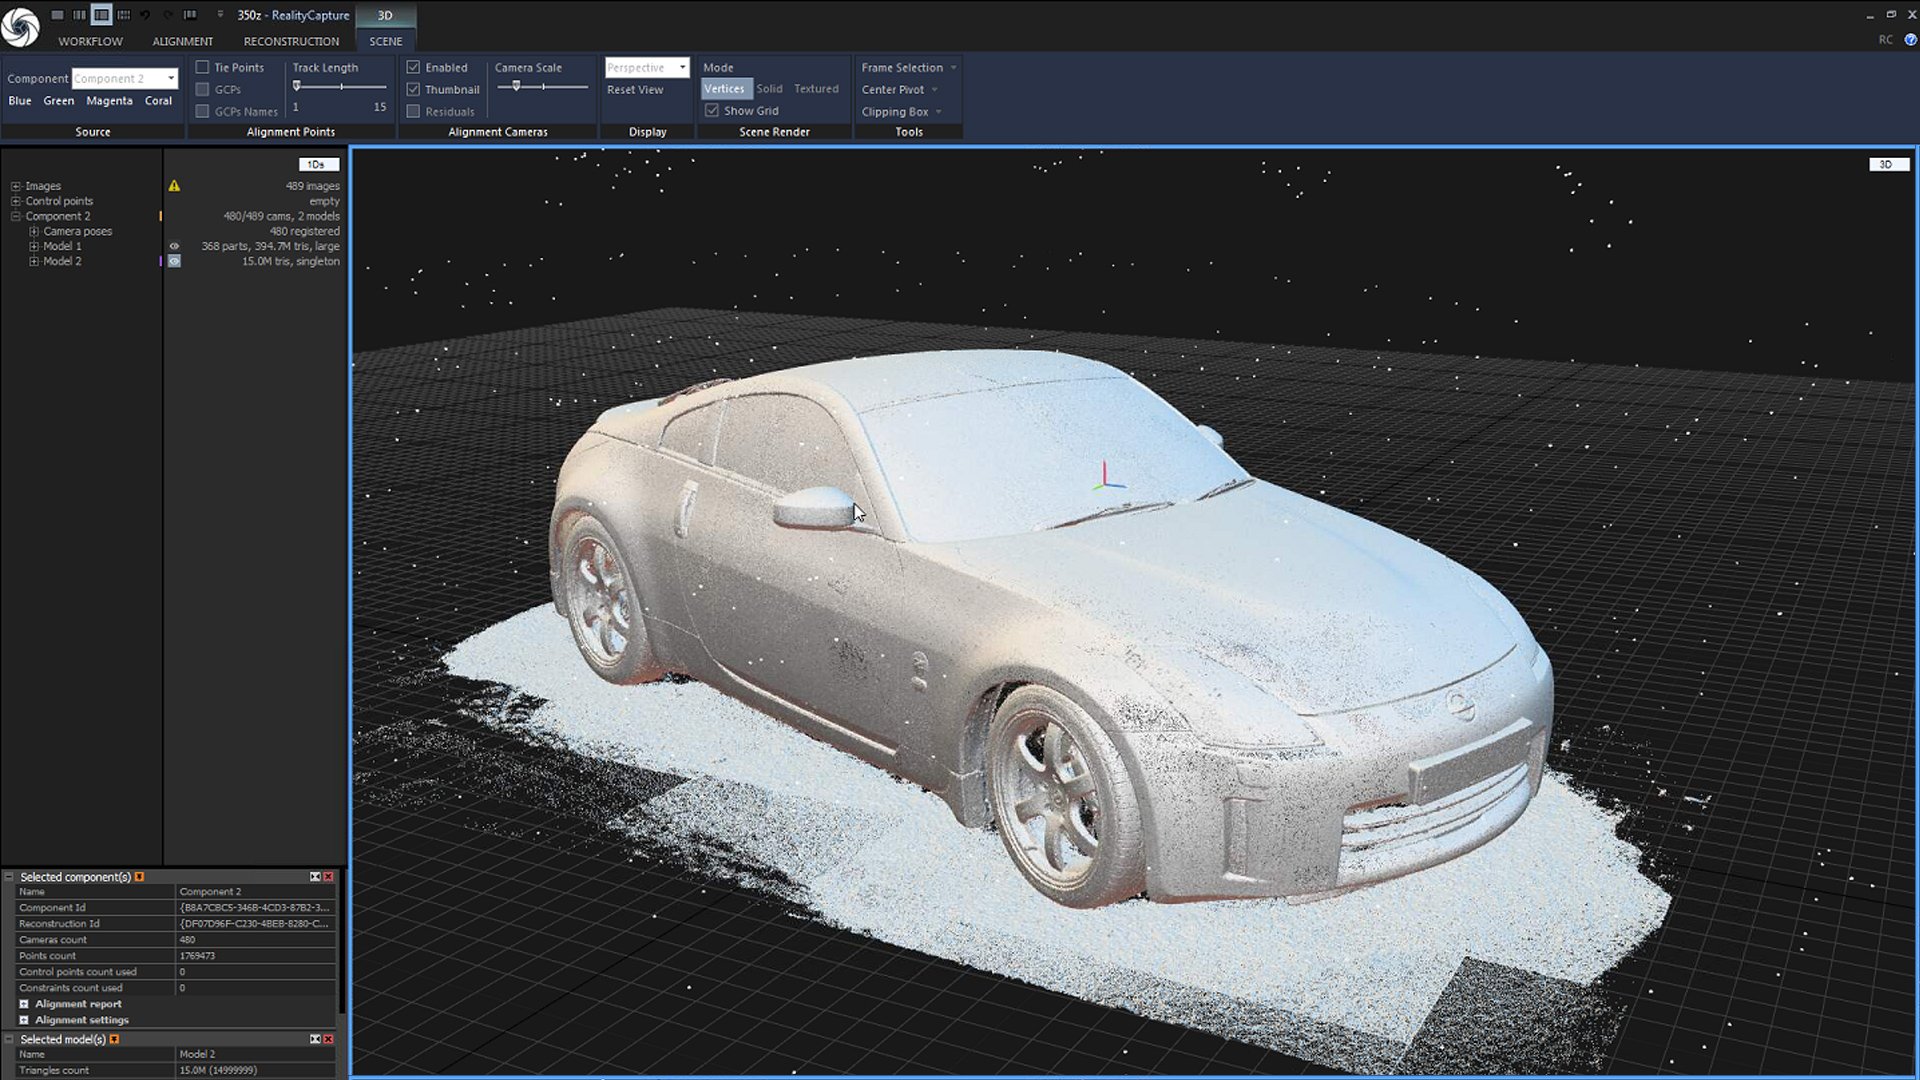
Further Experiments Using Reality Capture
This is a second test we conducted using an improved scanning technique with better lighting and image shooting techniques, this car will most likely be the subject of the tutorial. This particular test still has its problems, as you can see from the images surface noise is an issue and whilst it's fairly minimal we think we can all but eliminate by shooting with a tripod rather than handheld. As you can see we have managed to do a much better job of the headlights and occluded areas under the wheel arches. This scan was processed using Reality Capture.

We would be very interested to hear from you regarding what software you would prefer us to use for the tutorial. AGI photo scan or Reality Capture, please let us know in the comments below.
158 Comment(s)
I would love to see an AGI photo scan tutorial. Thanks!
Thanks for letting us know Zachary! I might do both :)
Dear Frends, tell us how long does it wiil take to the tutorials release please)
The links to the free scans is broken, can you reupload the 350Z and the fiat scans?
1
1
1
1
1
1
1
1
1
1
1
1
1
1
1
1
1
1
1
1
1
1
1
1
1
This awesomw, One thing I would like to buy from you guys is a nice scan of tyres like different sizes, is really hard to achieve a perfect look with all details hehe^^
Thanks Jolberto, yes we have talked about this, it would be quite easy to do, just need a good selection of new tyres. Im sure our local garage would let us do it.
1
1
1
1
1
1
1
1
1
1
1
1
1
1
1
1
1
1
1
1
1
1
1
1
1
So this is only a model for download and there will be a tutorial later?
Yep that's right, the tutorial will be coming in the new year.
Seems to be the tutor will not gonna be released.
1
1
1
1
1
1
1
1
1
1
1
1
1
1
1
1
1
1
1
1
1
1
1
1
I like cars. I hate SDS modelling.
Tell us the secret :O
You will have to wait for the tutorial Maxim :)
1
1
1
1
1
1
1
1
1
1
1
1
1
1
1
1
1
1
1
1
1
Great looking results!
I would prefer to see Reality Capture over Agisoft, but either is fine.
Thanks Patrick, I think we might do both, it's more work but probably much more useful.
1
1
1
1
1
1
1
1
1
1
1
1
1
1
1
1
1
1
I would REALLY like a tutorial with Photoscan since that is the one I use. I have been testing scanning cars but so far it is not good so this will be an interesting read!
thanks a lot...
Leo
Ok no problem Leonardo. It's actually harder with PS as it can't handle as many images as easily as RC can but I will cover it in the tutorial.
1
1
1
1
1
1
1
1
1
1
1
1
1
1
1
I bet the technique has something to do with polarizing filtered shots averaged together. That would get rid of a lot of reflections. Gotta think about this one. Interesting problem, for sure.
You won't get it out of us until the tutorial is released I'm afraid Andy :)
1
1
1
1
1
1
1
1
1
1
1
1
1
1
1
Agisoft please!!
No problem :)
1
1
1
1
1
1
1
1
1
1
1
1
1
1
1
I prefer Reality Capture, but there are more Agisoft users so my vote is for Photoscan. Both would be ideal though :)
I think based on the response we will do both :)
1
1
1
1
1
1
1
1
1
1
1
1
1
1
1
Photoscan
Will you post a link to the tutorial, or how we know when it's ready?
Yes we will post a link on our Facebook pages and newsletter.
1
1
1
1
1
1
1
1
1
1
1
1
1
1
1
Mac based for the moment, and running all other PC software under bootcsmp&windows10. Sadly, Mac does not have compatible CPU for reality capture,therefore, I prefer the tut for Agi even though it will take several hundred years:)
Ha ha yea it might take some time and also might need splitting up into chunks for people without huge amounts of RAM. :)
1
1
1
1
1
1
1
1
1
1
1
1
1
1
1
I would like to see the process in Photoscan.
I'm very curious to see your workflow!
Is that picture of the 370z (http://www.3dscanstore.com/image/data/01CarScan/car.jpg),
from the shots you used for the 3d scan?
Or is it just a random photo?
1
1
1
1
1
1
1
1
1
1
1
1
1
1
1
I would love both of them!
1
1
1
1
1
1
1
1
1
1
1
1
1
1
I am sorry maybe I missed a post explaining it but when do you think you will be able to have the tutorials up?
thanks a lot...
Leo
1
1
1
1
1
1
1
1
1
1
1
1
1
1
I'd love to see the Photoscan workflow. Are there any news regarding this tutorial?
1
1
1
1
1
1
1
1
1
1
1
1
1
1
Would love to see a tutorial on this subject
1
1
1
1
1
1
1
1
1
1
1
1
1
Hi, I'm looking forward to see tutorial :D Can you indicate us when it's gonna be released?
1
1
1
1
1
1
1
1
1
1
1
1
1
1
I'm working on it too:
Honda Civic 3d Scan
https://vimeo.com/216083710
https://www.flickr.com/photos/150354121@N02/
These captures look amazing! Great work! I'm going to do some trial and error runs to see what kind of results I can get. Do you have any recommended settings? The tutorial looks to have been side stepped.....I'm really interested in learning more info about this!
1
1
1
1
1
1
1
1
1
1
1
1
1
1
Hey there,
how are you guys doing?
We are waiting all so thrilled for the tutorial ;)
Actually I would like to ask you for a collaboration / business inquiry. BUT the question is, would you like to develop a system where we can scan hundrets of cars a day? We do. With you.
Give us a shout.
1
1
1
1
1
1
1
1
1
1
1
1
1
1
Hey guys,
thank you for your great work. I think there are a lot of people very interested in the workflow and a tutorial. So please do us the favour, we really would appreciate it.
Thanks
1
1
1
1
1
1
1
1
1
1
1
1
1
1
Hello good afternoon.
Thanks for sharing the great stuff.
I would also like to see the tutorial using the two software options.
Regards
Nilton Cavenaghi
Brasil
1
1
1
1
1
1
1
1
1
1
1
1
1
1
I guess this subject went dark and they decided not to divulge the information? I havent seen anything about it anywhere??
1
1
1
1
1
1
1
1
1
1
1
1
1
1
Yeah, looks like they decided to keep it for themselves... unfortunately :(
1
1
1
1
1
1
1
1
1
1
1
1
1
1
Great introduction on how you are scanning cars. Was the tutorial of how you did this available somewhere? You mention doing a post about that in this and was wondering were I could find that post.
Thank you,
1
1
1
1
1
1
1
1
1
1
1
1
1
1
A bit of a bait-and-switch, seems like. It's 2018 and no info in sight. I guess you guys decided it would be bad for business.
1
1
1
1
1
1
1
1
1
1
1
1
1
1
hi.please release tutorial!we dead!
1
1
1
1
1
1
1
1
1
1
1
1
1
1
1
1
1
1
1
1
1
1
1
1
1
1
1
1
1
1
1
1
1
1
1
1
1
1
1
1
1
1
1
1
1
1
1
1
1
1
1
1
1
1
1
1
1
1
1
1
1
1
1
1
1
1
1
1
1
1
1
1
1
1
1
1
1
1
Hello There,
Has the 3D Scan been removed or is it just my browser that won't allow the download?
If possible would you please be able to make the 3D scan available again?
Thanks very much!
1
1
1
1
1
1
It's really cool work.
I came here because I was interested in car scanning.
Are there any tutorials released?
1
1
1
1
1
1
the link to the free scans is broken, can you reupload them please?
1
1
1
1
1
1
1
1
1
1
1
1
1
1
1
1
1
1
1
1
1
1
1
1
1
1
1
1
1
1
1
1
1
1
1
1
1
1
1
1
1
1
1
1
1
1
1
1
1
1
1
1
1
1
1
1
1
1
1
1
1
1
1
1
1
1
1
1
1
1
1
1
1
1
1
1
1
1
1
1
1
1
1
1
1
It's actually a great and useful piece of information. I am glad that you just shared this helpful info with us. Please keep us up to date like this. Thank you for sharing.
I'd incessantly want to be update on new blog posts on this site, saved to favorites!
Whoah this blog is excellent i like studying your articles. Keep up the great work! You understand, a lot of individuals are looking round for this information, you can help them greatly.
I love it when people come together and share ideas. Great website, keep it up!
Greetings! Very useful advice within this post! It is the little changes that will make the largest changes. Thanks a lot for sharing!
What's up, I read your blogs on a regular basis. Your humoristic style is witty, keep up the good work!
I will right away clutch your rss feed as I can not in finding your e-mail subscription hyperlink or e-newsletter service. Do you have any? Please permit me understand so that I could subscribe. Thanks.
Ahaa, its good dialogue regarding this article at this place at this weblog, I have read all that, so at this time me also commenting at this place.
It's very effortless to find out any topic on web as compared to books, as I found this article at this site.
I'm still learning from you, as I'm making my way to the top as well. I absolutely enjoy reading everything that is posted on your website.Keep the posts coming. I liked it!
Ahaa, its nice conversation about this piece of writing here at this website, I have read all that, so at this time me also commenting at this place.
Ahaa, its fastidious conversation regarding this post here at this webpage, I have read all that, so now me also commenting here.
I will right away grasp your rss as I can’t to find your email subscription link or newsletter service. Do you’ve any? Please let me understand so that I could subscribe. Thanks.
Wow! This can be one particular of the most beneficial blogs We've ever arrive across on this subject. Basically Great. I am also an expert in this topic therefore I can understand your effort.
I am sure this paragraph has touched all the internet viewers, its really really fastidious post on building up new webpage.
I visited several blogs but the audio feature for audio songs present at this website is truly fabulous.
I am sure this piece of writing has touched all the internet viewers, its really really good article on building up new webpage.
The tool follows legal reference metrics, providing reliable data for drinking responsibly.
Thiss iss a toic that is close tto my heart... Takke care! Whdre aree your contact details though?
Hello, I read your blog like every week. Your writing style is awesome, keep up the good work!
I enjoy what you guys tend to be up too. This kind of clever work and exposure! Keep up the wonderful works guys I've included you guys to our blogroll.
Ahaa, its fastidious discussion regarding this piece of writing at this place at this webpage, I have read all that, so at this time me also commenting here.
I visited multiple websites except the audio feature for audio songs current at this website is really superb.
Hi there, I found your web site by means of Google even as searching for a comparable subject, your site got here up, it seems to be good. I have bookmarked it in my google bookmarks.
I will immediately seize your rss as I can’t find your e-mail subscription link or e-newsletter service. Do you’ve any? Please let me know in order that I could subscribe. Thanks.
I will immediately snatch your rss feed as I can not find your e-mail subscription hyperlink or newsletter service. Do you have any? Please let me know so that I may just subscribe. Thanks.
Hi, I do believe this is a great blog. I stumbledupon it ;) I will revisit once again since I bookmarked it. Money and freedom is the greatest way to change, may you be rich and continue to guide others.
Ahaa, its good discussion regarding this article here at this webpage, I have read all that, so now me also commenting here.
I wanted to thank you for this great read!! I definitely loved every little bit of it. I have got you saved as a favorite to check out new stuff you
Hello, you used to write wonderful, but the last several posts have been kinda boring… I miss your tremendous writings. Past few posts are just a little bit out of track! come on!
Would love to perpetually get updated great web site!
I’ll immediately snatch your rss feed as I can’t in finding your email subscription link or e-newsletter service. Do you’ve any? Kindly allow me know in order that I could subscribe. Thanks.
Ahaa, its fastidious dialogue regarding this paragraph here at this blog, I have read all that, so now me also commenting at this place.
Its good as your other content :D, regards for putting up.
Hello mates, nice piece of writing and good arguments commented at this place, I am truly enjoying by these.cheap authentic jerseys
I am sure this paragraph has touched all the internet people, its really really nice piece of writing on building up new website.
I just could not depart your website prior to suggesting that I really loved the standard info a person supply to your visitors? Is gonna be back continuously to check out new posts
I enjoy what you guys are up too. Such clever work and reporting! Keep up the great works guys I've added you guys to our blogroll.
Fastidious answer back in return of this issue with real arguments and describing all regarding that.
Hi! Do you know if they make any plugins to help with Search Engine Optimization? I'm trying to get my blog to rank for some targeted keywords but I'm not seeing very good success. If you know of any please share. Thanks!
I will immediately clutch your rss feed as I can not in finding your email subscription link or e-newsletter service. Do you've any? Please permit me understand in order that I could subscribe. Thanks.
I just could not go away your web site before suggesting that I actually enjoyed the standard info a person provide on your guests? Is going to be again steadily in order to check out new posts
Greetings! Very helpful advice in this particular post! It's the little changes that produce the largest changes. Thanks a lot for sharing!
It's very trouble-free to find out any matter on net as compared to books, as I found this post at this website.
I will immediately seize your rss feed as I can not find your email subscription hyperlink or e-newsletter service. Do you’ve any? Kindly allow me understand so that I could subscribe. Thanks.
I also found <a href="https://aiphototemplate.com/
">this resource</a> really helpful.
Incredible! This blog looks just like my old one! It's on a entirely different topic but it has pretty much the same layout and design. Outstanding choice of colors!
Hola! I've been following your website for a while now and finally got the courage to go ahead and give you a shout out from Porter Texas! Just wanted to say keep up the excellent job!
I’ll immediately take hold of your rss as I can not find your e-mail subscription hyperlink or newsletter service. Do you have any? Kindly let me recognise so that I could subscribe. Thanks.
Greetings! I've been reading your web site for some time now and finally got the bravery to go ahead and give you a shout out from Austin Tx! Just wanted to mention keep up the excellent work!
For most recent news you have to pay a quick visit web and on web I found this web page as a most excellent website for newest updates.
I will right away grasp your rss as I can't in finding your email subscription hyperlink or newsletter service. Do you have any? Kindly let me realize so that I may subscribe. Thanks.
You’ve made some decent points there. I checked on the internet for more info about the issue and found most people will go along with your views on this site.
I also found <a href="https://wanxaivideo.com/
">Wanxaivideo</a> really helpful.
I also found <a href="https://wanxaivideo.com/
">an AI tool I've been using</a> really helpful.
I also found <a href="https://wanxaivideo.com/
">wanxaivideo.com</a> really helpful.
I also found <a href="https://aivideomeme.com/
">Aivideomeme</a> really helpful.
I also found <a href="https://glbviewer.com/
">the Glbviewer tool</a> really helpful.
Greetings! Very useful advice in this particular article! It's the little changes that produce the biggest changes. Thanks a lot for sharing!
I visited many sites except the audio quality for audio songs present at this website is genuinely superb.
Amazing! This blog looks just like my old one! It's on a totally different subject but it has pretty much the same page layout and design. Great choice of colors!
https://www.adnkronos.com/tecnologia/migliori-siti-per-comprare-follower-instagram-italiani-economici-paypal-apple-pay_6fv9cyn0I6Yu4QkHy29B8N
Whoa! This blog looks exactly like my old one! It's on a totally different topic but it has pretty much the same layout and design. Wonderful choice of colors!
i like
Greetings! Very helpful advice within this post! It is the little changes that produce the most significant changes. Many thanks for sharing!
Your way of explaining the whole thing in this piece of writing is in fact nice, every one be capable of effortlessly know it, Thanks a lot.
What's up, after reading this remarkable article i am too happy to share my knowledge here with friends.
I am sure this paragraph has touched all the internet viewers, its really really nice piece of writing on building up new webpage.
I will right away take hold of your rss feed as I can not to find your e-mail subscription hyperlink or e-newsletter service. Do you have any? Kindly let me understand so that I may subscribe. Thanks.
Ahaa, its pleasant dialogue concerning this post at this place at this website, I have read all that, so now me also commenting at this place.
Ahaa, its fastidious discussion concerning this post here at this web site, I have read all that, so now me also commenting at this place.
I am sure this article has touched all the internet viewers, its really really pleasant article on building up new website.
https://fullservicelavoro.jimdosite.com/
http://treeads.nation2.com/
https://jumperads.yolasite.com/
http://jumperads.nation2.com/
http://transferefurniture.hatenablog.com
https://atar-almadinah.weebly.com/
https://allmoversinriyadh.wordpress.com/
https://allmoversinriyadh.wordpress.com/2022/04/09/%d8%b4%d8%b1%d9%83%d8%a9-%d8%aa%d9%86%d8%b8%d9%8a%d9%81-%d8%a8%d8%a7%d9%84%d8%b1%d9%8a%d8%a7%d8%b6-%d9%85%d8%ac%d8%b1%d8%a8%d8%a9/
https://allmoversinriyadh.wordpress.com/2022/04/07/%d8%a7%d9%81%d8%b6%d9%84-%d8%b4%d8%b1%d9%83%d8%a9-%d8%aa%d9%86%d8%b8%d9%8a%d9%81-%d8%a8%d8%a7%d9%84%d8%b1%d9%8a%d8%a7%d8%b6/
https://allmoversinriyadh.wordpress.com/2022/05/13/%d8%b4%d8%b1%d9%83%d8%a9-%d9%86%d9%82%d9%84-%d8%b9%d9%81%d8%b4-%d9%88%d8%ba%d8%b1%d9%81-%d8%a7%d9%84%d9%86%d9%88%d9%85-%d8%a8%d8%a7%d9%84%d8%b1%d9%8a%d8%a7%d8%b6/
https://companymoversinjeddah.wordpress.com/
https://moversfurniture2018.wordpress.com/2018/12/30/%D8%A7%D9%87%D9%85-%D9%85%D9%83%D8%A7%D8%AA%D8%A8-%D9%88%D9%85%D8%A4%D8%B3%D8%B3%D8%A7%D8%AA-%D8%B4%D8%B1%D9%83%D8%A7%D8%AA-%D9%86%D9%82%D9%84-%D8%B9%D9%81%D8%B4-%D8%A8%D8%AC%D8%A7%D8%B2%D8%A7%D9%86/
https://moversriyadhcom.wordpress.com/
https://moversmedina.wordpress.com/
https://moversfurniture2018.wordpress.com/
https://moversmecca.wordpress.com/
https://khairyayman74.wordpress.com/
https://companymoversmecca.home.blog/
https://companymoverstaif.home.blog/
https://companymoverskhamismushit.home.blog/
https://whitear.home.blog/
https://companyhouseservice.wordpress.com/
http://bestmoversfurniture.wordpress.com/
https://companymoversjeddah.wordpress.com/
https://companycleaning307819260.wordpress.com/
https://companymoversriydah.wordpress.com/
https://ataralmadinah662300791.wordpress.com/
https://ataralmadinah662300791.wordpress.com/2022/02/05/%d8%b4%d8%b1%d9%83%d8%a9-%d9%86%d9%82%d9%84-%d8%b9%d9%81%d8%b4-%d8%a8%d8%a7%d9%84%d8%b1%d9%8a%d8%a7%d8%b6/
https://ataralmadinah662300791.wordpress.com/2022/04/12/%D8%B4%D8%B1%D9%83%D8%A9-%D9%86%D9%82%D9%84-%D8%B9%D9%81%D8%B4-%D9%85%D9%86-%D8%A7%D9%84%D8%B1%D9%8A%D8%A7%D8%B6-%D8%A7%D9%84%D9%89-%D8%A7%D9%84%D8%AF%D9%85%D8%A7%D9%85/
https://groups.google.com/g/moversfurniture/c/wwQFSNvgyAI
https://groups.google.com/g/moversfurniture/c/4L1oHETS4mQ
https://nowewyrazy.uw.edu.pl/profil/khairyayman
https://companyhouseservice.wordpress.com/2022/08/06/%d8%a7%d9%81%d8%b6%d9%84-%d8%b4%d8%b1%d9%83%d8%a9-%d8%aa%d9%86%d8%b8%d9%8a%d9%81-%d8%a8%d8%a7%d9%84%d8%b1%d9%8a%d8%a7%d8%b6/
https://ataralmadinah662300791.wordpress.com/ شركة الصقر الدولي لنقل العفش والاثاث وخدمات التنظيف المنزلية
https://jumperads.com/mecca/anti-insects-company-mecca.html شركة مكافحة حشرات بمكة
https://jumperads.com/mecca/water-leaks-detection-company-mecca.html شركة كشف تسربات بمكة
https://jumperads.com/mecca/mecca-company-surfaces.html شركة عزل اسطح بمكة
https://jumperads.com/mecca/mecca-company-sewage.html شركة تسليك مجاري بمكة
https://jumperads.com/mecca/mecca-cleaning-company-sofa.html شركة تنظيف كنب بمكة
https://jumperads.com/mecca/mecca-cleaning-company-mosques.html شركة تنظيف مساجد بمكة
https://jumperads.com/mecca/mecca-cleaning-company-Carpet.html شركة تنظيف سجاد بمكة
https://jumperads.com/mecca/mecca-cleaning-company-tanks.html شركة تنظيف خزانات بمكة
https://jumperads.com/mecca/mecca-cleaning-company-swimming-bath.html شركة تنظيف وصيانة مسابح بمكة
https://jumperads.com/mecca/mecca-cleaning-company-Furniture.html شركة تنظيف الاثاث بمكة
https://jumperads.com/mecca/mecca-cleaning-company-home.html شركة تنظيف شقق بمكة
https://jumperads.com/mecca/mecca-cleaning-company-Carpets.html شركة تنظيف موكيت بمكة
https://jumperads.com/mecca/mecca-cleaning-company.html شركة تنظيف مجالس بمكة
https://jumperads.com/mecca/mecca-cleaning-company-house.html شركة تنظيف منازل بمكة
https://jumperads.com/mecca/mecca-cleaning-company-curtains.html شركة تنظيف ستائر بمكة
https://jumperads.com/mecca/mecca-cleaning-company-Villas.html شركة تنظيف فلل بمكة
https://jumperads.com/mecca/mecca-company-tile.html شركة جلي بلاط بمكة
شركة مكافحة حشرات بجدة وكذلك شركة كشف تسربات المياه بجدة وتنظيف خزانات وتنظيف الموكيت والسجاد والكنب والشقق والمنازل بجدة وتنظيف الخزانات بجدة وتنظيف المساجد بجدة شركة تنظيف بجدة تنظيف المسابح بجدة
https://jumperads.com/jeddah/anti-insects-company-jeddah.html شركة مكافحة حشرات بجدة
https://jumperads.com/jeddah/water-leaks-detection-company-jeddah.html شركة كشف تسربات بجدة
https://jumperads.com/jeddah/jeddah-company-surfaces.html شركة عزل اسطح بجدة
https://jumperads.com/jeddah/jeddah-company-sewage.html شركة تسليك مجاري بجدة
https://jumperads.com/jeddah/jeddah-cleaning-company-sofa.html شركة تنظيف كنب بجدة
https://jumperads.com/jeddah/jeddah-cleaning-company-mosques.html شركة تنظيف مساجد بجدة
https://jumperads.com/jeddah/jeddah-cleaning-company-Carpet.html شركة تنظيف سجاد بجدة
https://jumperads.com/jeddah/jeddah-cleaning-company-tanks.html شركة تنظيف خزانات بجدة
https://jumperads.com/jeddah/jeddah-cleaning-company-swimming-bath.html شركة تنظيف وصيانة مسابح بجدة
https://jumperads.com/jeddah/jeddah-cleaning-company-Furniture.html شركة تنظيف الاثاث بجدة
https://jumperads.com/jeddah/jeddah-cleaning-company-home.html شركة تنظيف شقق بجدة
https://jumperads.com/jeddah/jeddah-cleaning-company-Carpets.html شركة تنظيف موكيت بجدة
https://jumperads.com/jeddah/jeddah-cleaning-company.html شركة تنظيف مجالس بجدة
https://jumperads.com/jeddah/jeddah-cleaning-company-house.html شركة تنظيف منازل بجدة
https://jumperads.com/jeddah/jeddah-cleaning-company-Villas.html شركة تنظيف فلل بجدة
https://jumperads.com/jeddah/jeddah-cleaning-company-curtains.html شركة تنظيف ستائر بجدة
https://jumperads.com/jeddah/jeddah-company-tile.html شركة جلي بلاط بجدة
https://emc-mee.com/blog.html شركات نقل العفش
اهم شركات كشف تسربات المياه بالدمام كذلك معرض اهم شركة مكافحة حشرات بالدمام والخبر والجبيل والخبر والاحساء والقطيف كذكل شركة تنظيف خزانات بجدة وتنظيف بجدة ومكافحة الحشرات بالخبر وكشف تسربات المياه بالجبيل والقطيف والخبر والدمام
https://emc-mee.com/cleaning-company-yanbu.html شركة تنظيف بينبع
https://emc-mee.com/blog.html شركة نقل عفش
اهم شركات مكافحة حشرات بالخبر كذلك معرض اهم شركة مكافحة حشرات بالدمام والخبر والجبيل والخبر والاحساء والقطيف كذلك شركة رش حشرات بالدمام ومكافحة الحشرات بالخبر
https://emc-mee.com/anti-insects-company-dammam.html شركة مكافحة حشرات بالدمام
شركة تنظيف خزانات بجدة الجوهرة من افضل شركات تنظيف الخزانات بجدة حيث ان تنظيف خزانات بجدة يحتاج الى مهارة فى كيفية غسيل وتنظيف الخزانات الكبيرة والصغيرة بجدة على ايدى متخصصين فى تنظيف الخزانات بجدة
https://emc-mee.com/tanks-cleaning-company-jeddah.html شركة تنظيف خزانات بجدة
https://emc-mee.com/water-leaks-detection-isolate-company-dammam.html شركة كشف تسربات المياه بالدمام
https://emc-mee.com/ شركة الفا لنقل عفش واثاث
https://emc-mee.com/transfer-furniture-jeddah.html شركة نقل عفش بجدة
https://emc-mee.com/transfer-furniture-almadina-almonawara.html شركة نقل عفش بالمدينة المنورة
https://emc-mee.com/movers-in-riyadh-company.html شركة نقل اثاث بالرياض
https://emc-mee.com/transfer-furniture-dammam.html شركة نقل عفش بالدمام
https://emc-mee.com/transfer-furniture-taif.html شركة نقل عفش بالطائف
https://emc-mee.com/transfer-furniture-mecca.html شركة نقل عفش بمكة
https://emc-mee.com/transfer-furniture-yanbu.html شركة نقل عفش بينبع
https://emc-mee.com/transfer-furniture-alkharj.html شركة نقل عفش بالخرج
https://emc-mee.com/transfer-furniture-buraydah.html شركة نقل عفش ببريدة
https://emc-mee.com/transfer-furniture-khamis-mushait.html شركة نقل عفش بخميس مشيط
https://emc-mee.com/transfer-furniture-qassim.html شركة نقل عفش بالقصيم
https://emc-mee.com/transfer-furniture-tabuk.html شركة نقل عفش بتبوك
https://emc-mee.com/transfer-furniture-abha.html شركة نقل عفش بابها
https://emc-mee.com/transfer-furniture-najran.html شركة نقل عفش بنجران
https://emc-mee.com/transfer-furniture-hail.html شركة نقل عفش بحائل
https://emc-mee.com/transfer-furniture-dhahran.html شركة نقل عفش بالظهران
https://emc-mee.com/transfer-furniture-kuwait.html شركة نقل عفش بالكويت
https://emc-mee.com/price-transfer-furniture-in-khamis-mushit.html اسعار شركات نقل عفش بخميس مشيط
https://emc-mee.com/numbers-company-transfer-furniture-in-khamis-mushit.html ارقام شركات نقل عفش بخميس مشيط
https://emc-mee.com/new-company-transfer-furniture-in-khamis-mushit.html شركة نقل عفش بخميس مشيط جديدة
https://emc-mee.com/transfer-furniture-from-khamis-to-riyadh.html شركة نقل عفش من خميس مشيط الي الرياض
https://emc-mee.com/transfer-furniture-from-khamis-mushait-to-mecca.html شركة نقل عفش من خميس مشيط الي مكة
https://emc-mee.com/transfer-furniture-from-khamis-mushait-to-jeddah.html شركة نقل عفش من خميس مشيط الي جدة
https://emc-mee.com/transfer-furniture-from-khamis-mushait-to-medina.html شركة نقل عفش من خميس مشيط الي المدينة المنورة
https://emc-mee.com/best-10-company-transfer-furniture-khamis-mushait.html افضل 10 شركات نقل عفش بخميس مشيط
https://emc-mee.com/%D8%B4%D8%B1%D9%83%D9%87-%D9%86%D9%82%D9%84-%D8%B9%D9%81%D8%B4-%D8%A8%D8%AC%D8%AF%D9%87.html
https://emc-mee.com/%D8%B4%D8%B1%D9%83%D8%A9-%D9%86%D9%82%D9%84-%D8%A7%D8%AB%D8%A7%D8%AB-%D8%A8%D8%AC%D8%AF%D9%87.html
https://saudi-germany.com/ شركة السعودي الالماني للخدمات المنزلية
https://saudi-germany.com/%d8%b4%d8%b1%d9%83%d8%a7%d8%aa-%d8%aa%d9%86%d8%b8%d9%8a%d9%81-%d8%ae%d8%b2%d8%a7%d9%86%d8%a7%d8%aa-%d8%a8%d8%ac%d8%af%d8%a9/ شركات تنظيف خزانات بجدة
https://saudi-germany.com/%d8%aa%d9%86%d8%b8%d9%8a%d9%81-%d8%ae%d8%b2%d8%a7%d9%86%d8%a7%d8%aa-%d8%a8%d8%ac%d8%af%d8%a9/ تنظيف خزانات بجدة
https://saudi-germany.com/%d8%a7%d9%81%d8%b6%d9%84-%d8%b4%d8%b1%d9%83%d8%a9-%d8%aa%d9%86%d8%b8%d9%8a%d9%81-%d8%ae%d8%b2%d8%a7%d9%86%d8%a7%d8%aa-%d8%a8%d8%ac%d8%af%d8%a9/ افضل شركة تنظيف خزانات بجدة
https://saudi-germany.com/%d8%a7%d8%b1%d8%ae%d8%b5-%d8%b4%d8%b1%d9%83%d8%a9-%d8%aa%d9%86%d8%b8%d9%8a%d9%81-%d8%ae%d8%b2%d8%a7%d9%86%d8%a7%d8%aa-%d8%a8%d8%ac%d8%af%d8%a9/ ارخص شركة تنظيف خزانات بجدة
https://saudi-germany.com/%d8%ba%d8%b3%d9%8a%d9%84-%d8%ae%d8%b2%d8%a7%d9%86%d8%a7%d8%aa-%d8%a8%d8%ac%d8%af%d8%a9/ غسيل خزانات بجدة
https://saudi-germany.com/%d8%b4%d8%b1%d9%83%d8%a9-%d8%aa%d9%86%d8%b8%d9%8a%d9%81-%d8%ae%d8%b2%d8%a7%d9%86%d8%a7%d8%aa-%d8%a8%d8%ac%d8%af%d8%a9/ شركة تنظيف خزانات بجدة
https://saudi-germany.com/cleaning-tanks-company-taif/
https://saudi-germany.com/cleaning-tanks-company-mecca/
https://saudi-germany.com/jumperads-transfer-furniture/
https://saudi-germany.com/%d8%a7%d9%81%d8%b6%d9%84-20-%d8%b4%d8%b1%d9%83%d8%a9-%d9%86%d9%82%d9%84-%d8%b9%d9%81%d8%b4-%d8%a8%d9%8a%d9%86%d8%a8%d8%b9-%d8%ae%d8%b5%d9%85-50-%d9%85%d8%b9-%d8%a7%d9%84%d9%81%d9%83-%d9%88%d8%a7/
https://saudi-germany.com/%d8%a7%d8%b1%d8%ae%d8%b5-%d8%b4%d8%b1%d9%83%d8%a9-%d9%86%d9%82%d9%84-%d8%b9%d9%81%d8%b4-%d8%ac%d8%af%d8%a9-%d8%ad%d9%8a-%d8%a7%d9%84%d8%b5%d9%81%d8%a7/
https://saudi-germany.com/%d8%a7%d8%b1%d8%ae%d8%b5-%d8%b4%d8%b1%d9%83%d8%a9-%d9%86%d9%82%d9%84-%d8%b9%d9%81%d8%b4-%d8%ac%d8%af%d8%a9-%d8%a7%d8%a8%d8%ad%d8%b1-%d8%a7%d9%84%d8%b4%d9%85%d8%a7%d9%84%d9%8a%d8%a9/
https://saudi-germany.com/%d8%a7%d8%b1%d9%82%d8%a7%d9%85-%d8%b4%d8%b1%d9%83%d8%a7%d8%aa-%d9%86%d9%82%d9%84-%d8%b9%d9%81%d8%b4-%d8%a8%d8%ac%d8%af%d8%a9-%d9%85%d8%b9-%d8%a7%d9%84%d8%aa%d8%ba%d9%84%d9%8a%d9%81/
https://saudi-germany.com/%d8%a7%d8%b1%d8%ae%d8%b5-%d8%b4%d8%b1%d9%83%d8%a9-%d9%86%d9%82%d9%84-%d8%b9%d9%81%d8%b4-%d8%a8%d8%ac%d8%af%d8%a9/
https://www.crtmovers.com/
https://www.crtmovers.com/2020/10/transfer-furniture-taif.html شركة نقل اثاث بالطائف
https://www.crtmovers.com/2020/10/transfer-furniture-madina.html
https://www.crtmovers.com/2020/10/movers-madina.html
https://www.crtmovers.com/2020/10/transfer-furniture-riyadh.html
https://www.crtmovers.com/2020/07/transfer-furniture-riyadh.html
https://www.crtmovers.com/2020/05/mecca-transfer-furniture-company-2020.html
https://www.crtmovers.com/2020/05/riyadh-transfer-furniture-company.html
https://www.crtmovers.com/2019/12/jeddah-transfer-furniture.html
https://www.crtmovers.com/2019/12/transfer-furniture-company-jeddah.html
https://www.crtmovers.com/2019/12/transfer-furniture-jeddah-1.html
https://www.crtmovers.com/2019/12/transfer-furniture-taif-1.html
https://www.crtmovers.com/2019/12/transfer-furniture-taif.html
https://www.crtmovers.com/2019/12/price-company-cleaning-tanks-jeddah.html
https://www.crtmovers.com/2019/12/blog-post.html
https://www.crtmovers.com/2019/12/cleaning-tanks-jeddah.html
https://www.crtmovers.com/2023/01/%d8%a7%d9%81%d8%b6%d9%84-%d8%b4%d8%b1%d9%83%d8%a9-%d9%86%d9%82%d9%84-%d8%b9%d9%81%d8%b4-%d8%a8%d8%ac%d8%af%d8%a9.html
شركة سكاي لخدمات نقل العفش والاثاث بالمنطقة العربية السعودية نحن نوفر خدمات نقل اثاث بالرياض ونقل عفش بالمدينة المنورة ونقل عفش بمكة ونقل عفش بالطائف نحن نقدم افضل نقل اثاث بخميس مشيط ونقل عفش بجدة
https://treeads.net/ شركة سكاي نقل العفش
https://treeads.net/blog.html مدونة لنقل العفش
https://treeads.net/movers-mecca.html شركة نقل عفش بمكة
https://treeads.net/movers-riyadh-company.html شركة نقل عفش بالرياض
https://treeads.net/all-movers-madina.html شركة نقل عفش بالمدينة المنورة
https://treeads.net/movers-jeddah-company.html شركة نقل عفش بجدة
https://treeads.net/movers-taif.html شركة نقل عفش بالطائف
https://treeads.net/movers-dammam-company.html شركة نقل عفش بالدمام
https://treeads.net/movers-qatif.html شركة نقل عفش بالقطيف
https://treeads.net/movers-jubail.html شركة نقل عفش بالجبيل
https://treeads.net/movers-khobar.html شركة نقل عفش بالخبر
https://treeads.net/movers-ahsa.html شركة نقل عفش بالاحساء
https://treeads.net/movers-kharj.html شركة نقل عفش بالخرج
https://treeads.net/movers-khamis-mushait.html شركة نقل عفش بخميس مشيط
https://treeads.net/movers-abha.html شركة نقل عفش بابها
https://treeads.net/movers-qassim.html شركة نقل عفش بالقصيم
https://treeads.net/movers-yanbu.html شركة نقل عفش بينبع
https://treeads.net/movers-najran.html شركة نقل عفش بنجران
https://treeads.net/movers-hail.html شركة نقل عفش بحائل
https://treeads.net/movers-buraydah.html شركة نقل عفش ببريدة
https://treeads.net/movers-tabuk.html شركة نقل عفش بتبوك
https://treeads.net/movers-dhahran.html شركة نقل عفش بالظهران
https://treeads.net/movers-rabigh.html شركة نقل عفش برابغ
https://treeads.net/movers-baaha.html شركة نقل عفش بالباحه
https://treeads.net/movers-asseer.html شركة نقل عفش بعسير
https://treeads.net/movers-mgmaa.html شركة نقل عفش بالمجمعة
https://treeads.net/movers-sharora.html شركة نقل عفش بشرورة
https://treeads.net/how-movers-furniture-yanbu.html كيفية نقل العفش بينبع
https://treeads.net/price-movers-furniture-yanbu.html اسعار نقل عفش بينبع
https://treeads.net/find-company-transfer-furniture-yanbu.html البحث عن شركات نقل العفش بينبع
https://treeads.net/transfer-furniture-khamis-mushit.html شركات نقل العفش بخميس مشيط
https://treeads.net/how-transfer-furniture-khamis-mushit.html كيفية نقل العفش بخميس مشيط
https://treeads.net/price-transfer-furniture-khamis-mushit.html اسعار نقل عفش بخميس مشيط
https://treeads.net/%D8%B4%D8%B1%D9%83%D8%A9-%D8%AC%D9%84%D9%8A-%D8%A8%D9%84%D8%A7%D8%B7-%D8%A8%D8%AC%D8%AF%D8%A9.html شركة جلي بلاط بجدة
https://treeads.net/%D8%B4%D8%B1%D9%83%D8%A9-%D8%AA%D9%86%D8%B8%D9%8A%D9%81-%D9%81%D9%84%D9%84-%D8%A8%D8%AC%D8%AF%D8%A9.html تنظيف فلل بجدة
https://treeads.net/company-transfer-furniture-jazan.html شركة نقل عفش بجازان
https://treeads.net/best-company-cleaning-jeddah-2020.html افضل شركة تنظيف بجدة
https://myspace.com/atarcompany
https://disqus.com/by/atarcompany/about/
https://www.instructables.com/member/dammamcompany64/?publicPreview=true
https://talk.plesk.com/members/atarcompany.414668/#about
https://www.indiegogo.com/individuals/38554392
https://pastebin.com/u/atarcompany
https://giphy.com/channel/atarcompany
https://www.longisland.com/profile/atarcompany
https://lichess.org/@/atarcompany
https://www.gta5-mods.com/users/atarcompany
https://www.divephotoguide.com/user/atarcompany
https://hub.docker.com/u/atarcompany
https://www.custommagnums.com/members/atarcompany.172020/
https://myanimelist.net/profile/atarcompany
https://www.viki.com/users/dammamcompany64_998/overview
https://www.intensedebate.com/people/atarcompany
https://www.designspiration.com/dammamcompany64/
https://www.ted.com/profiles/49307930
https://pbase.com/atarcompany/profile
https://www.producthunt.com/@atar_company
https://audiomack.com/dammamcompany64
https://sketchfab.com/atarcompany
https://www.magcloud.com/user/atarcompany
https://letterboxd.com/atarcompany/
https://speakerdeck.com/atarcompany
https://www.creativelive.com/student/atar-company?via=accounts-freeform_2
https://mastodon.social/@atarcompany
https://talkmarkets.com/member/atarcompany/
https://scioly.org/forums/memberlist.php?mode=viewprofile&u=157215
https://triberr.com/atarcompany
https://www.hackerearth.com/@dammamcompany64/
https://www.thelaw.com/members/atarcompany.140292/#about
https://www.affilorama.com/member/atarcompany
https://hashnode.com/@atarcompany
https://spinninrecords.com/profile/atarcompany
https://www.noteflight.com/profile/6f02598b164b4ae857e4a88552486a9678528bd6
https://www.diggerslist.com/atarcompany/about
https://developers.oxwall.com/user/atarcompany
https://www.metal-archives.com/users/atarcompany
https://www.ezistreet.com/profile/atarcompany/about
https://app.giveffect.com/users/1598877-atarcompany
https://www.mapleprimes.com/users/atarcompany
https://youmagine.com/atarcompany
https://app.zintro.com/profile/atarcompany
https://qiita.com/atarcompany
https://www.codechef.com/users/atarcompany
https://forums.giantitp.com/member.php?346420-atarcompany
https://www.f6s.com/company-dammam
https://www.mobafire.com/profile/atarcompany-1193728?profilepage
https://creator.wonderhowto.com/atarcompany/
https://www.openstreetmap.org/user/atarcompany
https://www.mightycause.com/profile/gs8xbg
https://www.warriorforum.com/members/company%20dammam.html?utm_source=internal&utm_medium=user-menu&utm_campaign=user-profile
https://www.behance.net/companydammam
https://trello.com/u/companydammam/
https://www.scca.com/atarcompany
http://www.domyate.com/2019/08/27/transfer-furniture-north-riyadh/ نقل عفش شمال الرياض
http://www.domyate.com/2019/09/05/movers-company-khamis-mushait/ شركات نقل عفش بخميس مشيط
http://www.domyate.com/2019/09/05/10-company-transfer-furniture-khamis-mushait/ شركة نقل العفش بخميس مشيط
http://www.domyate.com/2019/09/05/all-transfer-furniture-khamis-mushait/ شركات نقل اثاث بخميس مشيط
http://www.domyate.com/2019/09/05/best-company-transfer-furniture-khamis-mushit/ افضل شركات نقل اثاث بخميس مشيط
http://www.domyate.com/2019/09/05/company-transfer-furniture-khamis-mushit/ شركات نقل اثاث بخميس مشيط
http://www.domyate.com/category/%D9%86%D9%82%D9%84-%D8%B9%D9%81%D8%B4-%D8%AC%D8%AF%D8%A9/ نقل عفش جدة
http://www.domyate.com/2019/09/25/movers-furniture-from-jeddah-to-jordan/ نقل عفش من جدة الي الاردن
http://www.domyate.com/2019/10/03/price-cleaning-tanks-in-jeddah/ اسعار شركات تنظيف خزانات بجدة
http://www.domyate.com/2019/09/25/movers-furniture-from-jeddah-to-egypt/ نقل عفش من جدة الي مصر
http://www.domyate.com/2019/09/24/movers-furniture-from-jeddah-to-lebanon/ نقل عفش من جدة الي لبنان
http://www.domyate.com/2019/09/22/%d8%a3%d9%86%d8%ac%d8%ad-%d8%b4%d8%b1%d9%83%d8%a7%d8%aa-%d9%86%d9%82%d9%84-%d8%a7%d8%ab%d8%a7%d8%ab-%d8%a8%d8%ac%d8%af%d8%a9/ شركات نقل اثاث بجدة
http://www.domyate.com/2019/09/22/best-company-movers-jeddah/ افضل شركات نقل اثاث جدة
http://www.domyate.com/2019/09/22/company-transfer-furniture-yanbu/ شركات نقل العفش بينبع
http://www.domyate.com/2019/09/21/taif-transfer-furniture-company/ شركة نقل عفش في الطائف
http://www.domyate.com/2019/09/21/%d8%b4%d8%b1%d9%83%d8%a7%d8%aa-%d9%86%d9%82%d9%84-%d8%a7%d9%84%d8%b9%d9%81%d8%b4/ شركات نقل العفش
http://www.domyate.com/2019/09/21/%d8%b7%d8%b1%d9%82-%d9%86%d9%82%d9%84-%d8%a7%d9%84%d8%b9%d9%81%d8%b4/ طرق نقل العفش
http://www.domyate.com/2019/09/20/%d8%ae%d8%b7%d9%88%d8%a7%d8%aa-%d9%86%d9%82%d9%84-%d8%a7%d9%84%d8%b9%d9%81%d8%b4-%d9%88%d8%a7%d9%84%d8%a7%d8%ab%d8%a7%d8%ab/ خطوات نقل العفش والاثاث
http://www.domyate.com/2019/09/20/best-10-company-transfer-furniture/ افضل 10 شركات نقل عفش
http://www.domyate.com/2019/09/20/%d9%83%d9%8a%d9%81-%d9%8a%d8%aa%d9%85-%d8%a7%d8%ae%d8%aa%d9%8a%d8%a7%d8%b1-%d8%b4%d8%b1%d9%83%d8%a7%d8%aa-%d9%86%d9%82%d9%84-%d8%a7%d9%84%d8%b9%d9%81%d8%b4-%d9%88%d8%a7%d9%84%d8%a7%d8%ab%d8%a7%d8%ab/ اختيار شركات نقل العفش والاثاث
http://www.domyate.com/2019/09/20/cleaning-company-house-taif/ شركة تنظيف منازل بالطائف
http://www.domyate.com/2019/09/20/company-cleaning-home-in-taif/ شركة تنظيف شقق بالطائف
http://www.domyate.com/2019/09/20/taif-cleaning-company-villas/ شركة تنظيف فلل بالطائف
http://www.domyate.com/ شركة نقل عفش
http://www.domyate.com/2017/09/21/%D9%86%D9%82%D9%84-%D8%A7%D9%84%D8%B9%D9%81%D8%B4-%D9%88%D8%A7%D9%84%D8%AA%D8%AE%D8%B2%D9%8A%D9%86/ نقل العفش والتخزين
http://www.domyate.com/2016/07/02/transfer-furniture-dammam شركة نقل عفش بالدمام
http://www.domyate.com/2015/11/12/%D8%B4%D8%B1%D9%83%D8%A9-%D9%86%D9%82%D9%84-%D8%B9%D9%81%D8%B4-%D8%A8%D8%A7%D9%84%D9%85%D8%AF%D9%8A%D9%86%D8%A9-%D8%A7%D9%84%D9%85%D9%86%D9%88%D8%B1%D8%A9/ شركة نقل عفش بالمدينة المنورة
http://www.domyate.com/2016/06/05/transfer-furniture-jeddah/ شركة نقل عفش بجدة
http://www.domyate.com/2017/08/10/movers-company-mecca-naql/ شركات نقل العفش بمكة
http://www.domyate.com/2016/06/05/transfer-furniture-mecca/ شركة نقل عفش بمكة
http://www.domyate.com/2016/06/05/transfer-furniture-taif/ شركة نقل عفش بالطائف
http://www.domyate.com/2016/06/05/transfer-furniture-riyadh/ شركة نقل عفش بالرياض
http://www.domyate.com/2016/06/05/transfer-furniture-yanbu/ شركة نقل عفش بينبع
http://www.domyate.com/category/%D8%AE%D8%AF%D9%85%D8%A7%D8%AA-%D9%86%D9%82%D9%84-%D8%A7%D9%84%D8%B9%D9%81%D8%B4-%D9%88%D8%A7%D9%84%D8%AA%D8%AE%D8%B2%D9%8A%D9%86/ نقل العفش والتخزين
http://www.domyate.com/2015/08/30/furniture-transport-company-in-almadinah/ شركة نقل عفش بالمدينة المنورة
http://www.domyate.com/2016/06/05/transfer-furniture-medina-almonawara/ شركة نقل عفش بالمدينة المنورة
http://www.domyate.com/2018/10/13/%D9%86%D9%82%D9%84-%D8%B9%D9%81%D8%B4-%D8%AC%D8%AF%D8%A9-%D8%B4%D8%B1%D9%83%D8%A7%D8%AA-%D9%86%D9%82%D9%84-%D9%85%D9%85%D9%8A%D8%B2%D8%A9/ نقل عفش بجدة
http://www.domyate.com/2016/07/22/%d8%a7%d8%b1%d8%ae%d8%b5-%d8%b4%d8%b1%d9%83%d8%a9-%d9%86%d9%82%d9%84-%d8%b9%d9%81%d8%b4-%d8%a8%d8%a7%d9%84%d9%85%d8%af%d9%8a%d9%86%d8%a9-%d8%a7%d9%84%d9%85%d9%86%d9%88%d8%b1%d8%a9/ ارخص شركة نقل عفش بالمدينة المنورة
http://www.domyate.com/2016/07/25/%D8%B4%D8%B1%D9%83%D8%A9-%D9%86%D9%82%D9%84-%D8%B9%D9%81%D8%B4-%D8%A8%D8%A7%D9%84%D9%82%D8%B5%D9%8A%D9%85/ شركة نقل عفش بالقصيم
http://www.domyate.com/2016/07/25/%D8%B4%D8%B1%D9%83%D8%A9-%D9%86%D9%82%D9%84-%D8%B9%D9%81%D8%B4-%D8%A8%D8%AE%D9%85%D9%8A%D8%B3-%D9%85%D8%B4%D9%8A%D8%B7/ شركة نقل عفش بخميس مشيط
http://www.domyate.com/2016/07/25/%D8%B4%D8%B1%D9%83%D8%A9-%D9%86%D9%82%D9%84-%D8%B9%D9%81%D8%B4-%D8%A8%D8%A7%D8%A8%D9%87%D8%A7/ شركة نقل عفش بابها
http://www.domyate.com/2016/07/23/%D8%B4%D8%B1%D9%83%D8%A9-%D9%86%D9%82%D9%84-%D8%B9%D9%81%D8%B4-%D8%A8%D8%AA%D8%A8%D9%88%D9%83/ شركة نقل عفش بتبوك
شركة كيان لنقل العفش بالرياض والمدينة المنورة وجدة ومكة والطائف والدمام تقديم لكم دليل كامل لشركات نقل العفش بالمملكة العربية السعودية
https://mycanadafitness.com/ شركة كيان لنقل العفش
https://mycanadafitness.com/forum.html منتدي نقل العفش
https://mycanadafitness.com/movingfurnitureriyadh.html شركة نقل اثاث بالرياض
https://mycanadafitness.com/movingfurniturejaddah.html شركة نقل اثاث بجدة
https://mycanadafitness.com/movingfurnituremecca.html شركة نقل اثاث بمكة
https://mycanadafitness.com/movingfurnituretaif.html شركة نقل اثاث بالطائف
https://mycanadafitness.com/movingfurnituremadina.html شركة نقل اثاث بالمدينة المنورة
https://mycanadafitness.com/movingfurnituredammam.html شركة نقل اثاث بالدمام
https://mycanadafitness.com/movingfurniturekhobar.html شركة نقل اثاث بالخبر
https://mycanadafitness.com/movingfurnituredhahran.html شركة نقل اثاث بالظهران
https://mycanadafitness.com/movingfurniturejubail.html شركة نقل اثاث بالجبيل
https://mycanadafitness.com/movingfurnitureqatif.html شركة نقل اثاث بالقطيف
https://mycanadafitness.com/movingfurnitureahsa.html شركة نقل اثاث بالاحساء
https://mycanadafitness.com/movingfurniturekharj.html شركة نقل اثاث بالخرج
https://mycanadafitness.com/movingfurniturekhamismushit.html شركة نقل اثاث بخميس مشيط
https://mycanadafitness.com/movingfurnitureabha.html شركة نقل اثاث بابها
https://mycanadafitness.com/movingfurniturenajran.html شركة نقل اثاث بنجران
https://mycanadafitness.com/movingfurniturejazan.html شركة نقل اثاث بجازان
https://mycanadafitness.com/movingfurnitureasir.html شركة نقل اثاث بعسير
https://mycanadafitness.com/movingfurniturehail.html شركة نقل اثاث بحائل
https://mycanadafitness.com/movingfurnitureqassim.html شركة نقل عفش بالقصيم
https://mycanadafitness.com/movingfurnitureyanbu.html شركة نقل اثاث بينبع
https://mycanadafitness.com/movingfurnitureburaidah.html شركة نقل عفش ببريدة
https://mycanadafitness.com/movingfurniturehafralbatin.html شركة نقل عفش بحفر الباطن
https://mycanadafitness.com/movingfurniturerabigh.html شركة نقل عفش برابغ
https://mycanadafitness.com/movingfurnituretabuk.html شركة نقل عفش بتبوك
https://mycanadafitness.com/movingfurnitureasfan.html شركة نقل عفش بعسفان
https://mycanadafitness.com/movingfurnituresharora.html شركة نقل عفش بشرورة
https://mycanadafitness.com/companis-moving-riyadh.html شركات نقل العفش بالرياض
https://mycanadafitness.com/cars-moving-riyadh.html سيارات نقل العفش بالرياض
https://mycanadafitness.com/company-number-moving-riyadh.html ارقام شركات نقل العفش بالرياض
https://mycanadafitness.com/company-moving-jeddah.html شركات نقل العفش بجدة
https://mycanadafitness.com/price-moving-jeddah.html اسعار نقل العفش بجدة
https://mycanadafitness.com/company-moving-mecca.html شركات نقل العفش بمكة
http://fullservicelavoro.com/ شركة ريلاكس لنقل العفش والاثاث
http://fullservicelavoro.com/2019/01/07/transfer-movers-taif-furniture/ شركة نقل عفش بالطائف
http://fullservicelavoro.com/2019/01/08/transfer-movers-riyadh-furniture/ شركة نقل عفش بالرياض
http://fullservicelavoro.com/2019/01/08/transfer-movers-jeddah-furniture/ شركة نقل عفش بجدة
http://fullservicelavoro.com/2019/01/01/transfer-and-movers-furniture-mecca/ شركة نقل عفش بمكة
http://fullservicelavoro.com/2019/01/07/transfer-movers-madina-furniture/ شركة نقل عفش بالمدينة المنورة
http://fullservicelavoro.com/2019/01/07/transfer-movers-khamis-mushait-furniture/ شركة نقل عفش بخميس مشيط
http://fullservicelavoro.com/2019/01/09/transfer-movers-abha-furniture/ شركة نقل اثاث بابها
http://fullservicelavoro.com/2019/01/07/transfer-movers-najran-furniture/ شركة نقل عفش بنجران
http://fullservicelavoro.com/2019/01/16/transfer-movers-hail-furniture/ ِشركة نقل عفش بحائل
http://fullservicelavoro.com/2019/01/16/transfer-movers-qassim-furniture/ شركة نقل عفش بالقصيم
http://fullservicelavoro.com/2019/02/02/transfer-movers-furniture-in-bahaa/ شركة نقل عفش بالباحة
http://fullservicelavoro.com/2019/01/13/transfer-movers-yanbu-furniture/ شركة نقل عفش بينبع
http://fullservicelavoro.com/2019/01/18/%d8%af%d9%8a%d9%86%d8%a7-%d9%86%d9%82%d9%84-%d8%b9%d9%81%d8%b4-%d8%a8%d8%a7%d8%a8%d9%87%d8%a7/ دينا نقل عفش بابها
http://fullservicelavoro.com/2019/01/13/%D9%86%D9%82%D9%84-%D8%A7%D9%84%D8%A7%D8%AB%D8%A7%D8%AB-%D8%A8%D8%A7%D9%84%D9%85%D8%AF%D9%8A%D9%86%D8%A9-%D8%A7%D9%84%D9%85%D9%86%D9%88%D8%B1%D8%A9-%D8%A7%D9%87%D9%85-%D8%B4%D8%B1%D9%83%D8%A7%D8%AA/ نقل الاثاث بالمدينة المنورة
http://fullservicelavoro.com/2019/01/12/%D8%A7%D8%B1%D8%AE%D8%B5-%D8%B4%D8%B1%D9%83%D8%A9-%D9%86%D9%82%D9%84-%D8%B9%D9%81%D8%B4-%D8%A8%D9%85%D9%83%D8%A9/ ارخص شركة نقل عفش بمكة
http://fullservicelavoro.com/2019/01/07/transfer-movers-elkharj-furniture/ شركة نقل عفش بالخرج
http://fullservicelavoro.com/2019/01/07/transfer-movers-baqaa-furniture/ شركة نقل عفش بالبقعاء
http://fullservicelavoro.com/2019/02/05/transfer-furniture-in-jazan/ شركة نقل عفش بجازان
https://sites.google.com/view/movers-riyadh/
https://sites.google.com/view/movers-riyadh/movers-mecca
https://sites.google.com/view/movers-riyadh/home
https://sites.google.com/view/movers-riyadh/movers-jedaah-elhamdniah
https://sites.google.com/view/movers-riyadh/movers-yanbu
https://sites.google.com/view/movers-riyadh/movers-najran
https://sites.google.com/view/movers-riyadh/movers-Jizan
https://sites.google.com/view/movers-riyadh/jazan
https://sites.google.com/view/movers-riyadh/taif
https://sites.google.com/view/movers-riyadh/moversjeddah
https://sites.google.com/view/movers-riyadh/movers-abha
https://sites.google.com/view/movers-riyadh/movers-elahsa
https://sites.google.com/view/movers-riyadh/movers-elkhobar
https://sites.google.com/view/movers-riyadh/movers-elkharj
https://sites.google.com/view/movers-riyadh/movers-elmadina-elmnowara
https://sites.google.com/view/movers-riyadh/movers-eljubail
https://sites.google.com/view/movers-riyadh/movers-elqassim
https://sites.google.com/view/movers-riyadh/movers-hafrelbatin
https://sites.google.com/view/movers-riyadh/movers-elbaha
https://sites.google.com/view/movers-riyadh/movers-jeddah
https://sites.google.com/view/movers-riyadh/movers-dammam
https://sites.google.com/view/movers-riyadh/movers-taif
https://sites.google.com/view/movers-riyadh/movers-burydah
https://sites.google.com/view/movers-riyadh/movers-tabuk
https://sites.google.com/view/movers-riyadh/movers-hail
https://sites.google.com/view/movers-riyadh/movers-khamis-mushait
https://sites.google.com/view/movers-riyadh/movers-rabigh
https://sites.google.com/view/movers-riyadh/madina
https://sites.google.com/view/movers-riyadh/mecca
https://sites.google.com/view/movers-riyadh/dammam
https://sites.google.com/view/movers-riyadh/jeddah
https://sites.google.com/view/movers-riyadh/ahsa
https://sites.google.com/view/movers-riyadh/cleaning-mecca
https://movingsaudia.over-blog.com/
https://sakr-eg.jimdosite.com/blog/shrk-nql-aafsh-bmk/
https://emc-mee.jimdosite.com/blog/moving-furniture-abha/
https://emc-mee.jimdosite.com/
https://emc-mee.jimdosite.com/blog/cleaning-jeddah/
https://emc-mee.jimdosite.com/my-services/
https://www.sbnation.com/users/mycanadafitness
https://sakr-eg.jimdosite.com/moving-furniture-jeddah/
https://seg7544.wixsite.com/my-site-1/post/%D8%B4%D8%B1%D9%83%D8%A9-%D9%86%D9%82%D9%84-%D9%88%D8%AA%D8%BA%D9%84%D9%8A%D9%81-%D8%B9%D9%81%D8%B4-%D8%A8%D8%A7%D8%A8%D9%87%D8%A7
https://seg7544.wixsite.com/my-site-1
https://companyservice33.weebly.com/blog1/8069015
https://companyservice33.weebly.com/blog1/1275122
https://companyservice33.weebly.com/blog1
https://www.skreebee.com/read-blog/110085
https://telegra.ph/%D8%B4%D8%B1%D9%83%D8%A9-%D9%86%D9%82%D9%84-%D8%B9%D9%81%D8%B4-%D9%85%D9%86-%D8%AC%D8%AF%D8%A9-%D8%A7%D9%84%D9%89-%D8%AC%D8%A7%D8%B2%D8%A7%D9%86-07-12
https://webyourself.eu/blogs/25649/%D8%B4%D8%B1%D9%83%D8%A9-%D9%86%D9%82%D9%84-%D8%B9%D9%81%D8%B4-%D9%85%D9%86-%D8%AC%D8%AF%D8%A9-%D8%A7%D9%84%D9%89-%D8%AC%D8%A7%D8%B2%D8%A7%D9%86
https://webyourself.eu/blogs/26016/%D8%A7%D9%81%D8%B6%D9%84-%D8%B4%D8%B1%D9%83%D8%A9-%D9%86%D9%82%D9%84-%D8%B9%D9%81%D8%B4-%D8%AC%D8%AF%D8%A9-%D8%A7%D8%A8%D8%AD%D8%B1-%D8%A7%D9%84%D8%B4%D9%85%D8%A7%D9%84%D9%8A%D8%A9
https://www.domyate.com/2022/06/14/why-emc-mee-company-to-transfer-furniture-to-to-jeddah/
https://www.domyate.com/2022/06/12/best-nakl-afsh-jeddah/
https://www.domyate.com/2022/06/12/%d9%83%d9%8a%d9%81%d9%8a%d8%a9-%d9%81%d9%83-%d9%88%d8%aa%d8%b1%d9%83%d9%8a%d8%a8-%d8%a7%d9%84%d8%b9%d9%81%d8%b4-%d9%88%d8%a7%d9%84%d8%a7%d8%ab%d8%a7%d8%ab-%d8%a8%d8%ac%d8%af%d8%a9/
https://telegra.ph/%D8%A7%D9%81%D8%B6%D9%84-%D8%B4%D8%B1%D9%83%D8%A9-%D8%AA%D9%86%D8%B8%D9%8A%D9%81-%D9%85%D9%83%D9%8A%D9%81%D8%A7%D8%AA-%D8%A8%D9%85%D9%83%D8%A9-07-17
https://www.carookee.de/forum/Retinoblastom-Forum/32167083?mp=156822404062d6023635638289af31b90d4f5bbea03aea79dc802ca&mps=%26%231588%3B%26%231585%3B%26%231603%3B%26%231577%3B+%26%231578%3B%26%231606%3B%26%231592%3B%26%231610%3B%26%231601%3B+%26%231605%3B%26%231603%3B%26%231610%3B%26%231601%3B%26%231575%3B%26%231578%3B+%26%231576%3B%26%231605%3B%26%231603%3B%26%231577%3B#32167083
https://www.carookee.de/forum/Retinoblastom-Forum/32167082?mp=49083704862d5f02883b054f8275606a980b0ddf6bde4bc1a0c4b5&mps=%26%231588%3B%26%231585%3B%26%231603%3B%26%231577%3B+%26%231606%3B%26%231602%3B%26%231604%3B+%26%231593%3B%26%231601%3B%26%231588%3B+%26%231575%3B%26%231604%3B%26%231589%3B%26%231602%3B%26%231585%3B+%26%231575%3B%26%231604%3B%26%231583%3B%26%231608%3B%26%231604%3B%26%231610%3B#32167082
https://www.carookee.de/forum/Retinoblastom-Forum/32167084?mp=156822404062d604da7583a085d6df59451e00fbf675ffe4d767997&mps=%26%231588%3B%26%231585%3B%26%231603%3B%26%231577%3B+%26%231578%3B%26%231606%3B%26%231592%3B%26%231610%3B%26%231601%3B+%26%231582%3B%26%231586%3B%26%231575%3B%26%231606%3B%26%231575%3B%26%231578%3B+%26%231576%3B%26%231582%3B%26%231605%3B%26%231610%3B%26%231587%3B+%26%231605%3B%26%231588%3B%26%231610%3B%26%231591%3B#32167084
https://www.carookee.de/forum/Retinoblastom-Forum/32167085?mp=156822404062d60ab56d77ab711e09fefce9f81dfa2064fdad6969e&mps=%26%231588%3B%26%231585%3B%26%231603%3B%26%231577%3B+%26%231606%3B%26%231602%3B%26%231604%3B+%26%231593%3B%26%231601%3B%26%231588%3B+%26%231605%3B%26%231606%3B+%26%231580%3B%26%231583%3B%26%231577%3B+%26%231575%3B%26%231604%3B%26%231609%3B+%26%231580%3B%26%231575%3B%26%231586%3B%26%231575%3B%26%231606%3B#32167085
https://elasakr-jeddah.jimdosite.com/
https://business.go.tz/web/rashid.ndimbo/~/86020/home/-/message_boards/message/24415721
https://business.go.tz/web/rashid.ndimbo/~/86020/home/-/message_boards/message/24415731
https://business.go.tz/web/rashid.ndimbo/~/86020/home/-/message_boards/message/24458120
https://business.go.tz/web/rashid.ndimbo/~/86020/home/-/message_boards/message/24456486
https://bestmoversfurniture.wordpress.com/2022/04/05/transfer-furniture-jeddah/
https://www.smore.com/ps2zt
https://www.smore.com/s9rz8q
https://www.smore.com/0kthj
https://companyhouseservice.wordpress.com/2022/08/06/%d8%a7%d9%81%d8%b6%d9%84-%d8%b4%d8%b1%d9%83%d8%a9-%d8%aa%d9%86%d8%b8%d9%8a%d9%81-%d8%a8%d8%a7%d9%84%d8%b1%d9%8a%d8%a7%d8%b6/
https://topsitenet.com/startpage/ataralmadinah/859508/
https://topsitenet.com/profile/ataralmadinah/859508/
https://en.gravatar.com/elsakrjeddah
https://610b31f1e425e.site123.me/about
https://www.kickstarter.com/profile/atar-almadinah/about
https://500px.com/p/ataralmadinah?view=photos
https://about.me/atar-almadinah/
https://www.behance.net/ataralmadinah/
https://vimeo.com/user163509125
https://www.myminifactory.com/users/atar
https://speakerdeck.com/almadinah
https://www.instructables.com/member/atar-almadinah/
https://www.recode.net/users/ataralmadinah
http://simp.ly/p/bwJRTQ
https://zenwriting.net/jzlzjv7sf2
https://writer.zohopublic.com/writer/published/rg9748fafd0f2210f4604b33d2cbf28388aea
https://my.desktopnexus.com/ataralmadinah/journal/furniture-moving-company-in-jeddah-38820/
https://app.ex.co/stories/item/c9e4da01-b4c3-492f-84a4-55474a6abf47
https://pastelink.net/a93tslol
https://pastelink.net/6zkez7a2
https://www.kongregate.com/accounts/ataralmadinah
https://bit.ly/3PiheFn
https://bit.ly/3SJJZxX
Heya i'm for the primary time here. I found this board and I find It truly helpful & it helped me out much. I hope to provide one thing back and aid others like you helped me.
Wow, this post is nice, my sister is analyzing these kinds of things, thus I am going to let know her.
This is a topic that’s close to my heart… Take care! Where are your contact details though?
Ahaa, its good dialogue on the topic of this post at this place at this weblog, I have read all that, so at this time me also commenting at this place.
I am sure this post has touched all the internet people, its really really fastidious post on building up new webpage.
Hello colleagues, good piece of writing and pleasant urging commented at this place, I am actually enjoying by these.
There is certainly a great deal to learn about this subject. I really like all the points you made.
Ahaa, iits pleasant converfsation abot this article aat this plae at thbis website, I hawve read alll that, sso noow mme alsso commenting here.
I seriously love your site.. Great colors & theme. Did you build this website yourself? Please reply back as I'm wanting to create my own website and want to know where you got this from or what the theme is named. Thanks!
Thanks for any other excellent post. Where else could anyone get that type of info in such a perfect way of writing? I have a presentation subsequent week, and I am on the search for such info.
These have some kind of special impact associated with them, corresponding to putting the enemy Pokemon to sleep or poisoning them.
Ahaa, its pleasant discussion concerning this post here at this web site, I have read all that, so now me also commenting at this place.
I really enjoy looking through on this site, it contains fantastic content.
Wow, this paragraph is pleasant, my younger sister is analyzing such things, so I am going to convey her.
It's very easy to find out any matter on net as compared to textbooks, as I found this piece of writing at this web site.
I will immediately clutch your rss feed as I can not to find your email subscription hyperlink or newsletter service. Do you’ve any? Kindly allow me recognize so that I may subscribe. Thanks.
Ahaa, its pleasant dialogue about this piece of writing here at this webpage, I have read all that, so now me also commenting here.
Leave a Comment